


- First Steps Checklist
-
Frequently Asked Questions
-
All About Features
- How to Install the Tracking Code
-
User Guides
-
Integrating With Other Platforms
-
Legal, Data Privacy & Certificates
- TWAIA Addendum
- Glossary
- Contact
INTP Admin Panel Features
Overview
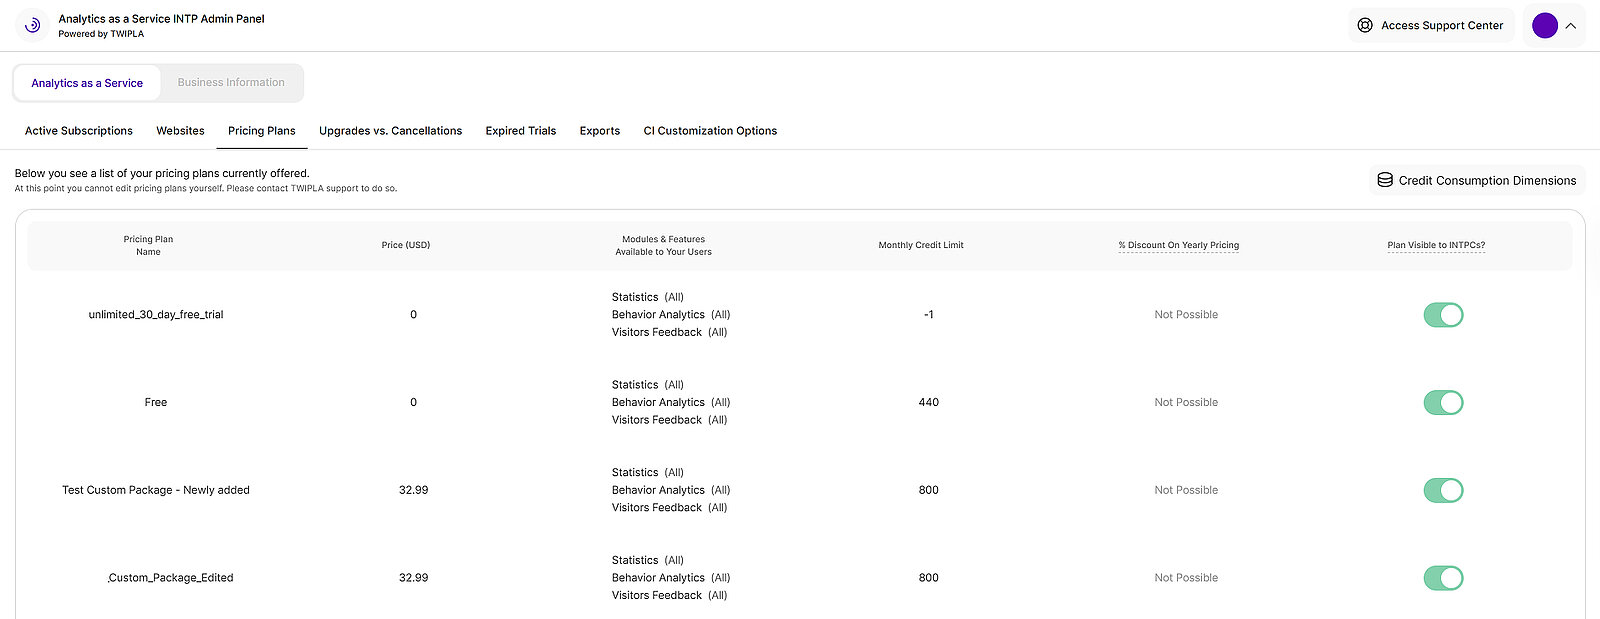
The INTP Admin Panel serves as the control center for your Analytics as a Service integration. To streamline your workflow, the interface is organized into seven distinct tabs, each dedicated to a specific area of platform management.
Select a tab from the main menu to access its unique features:
Support Center Integration
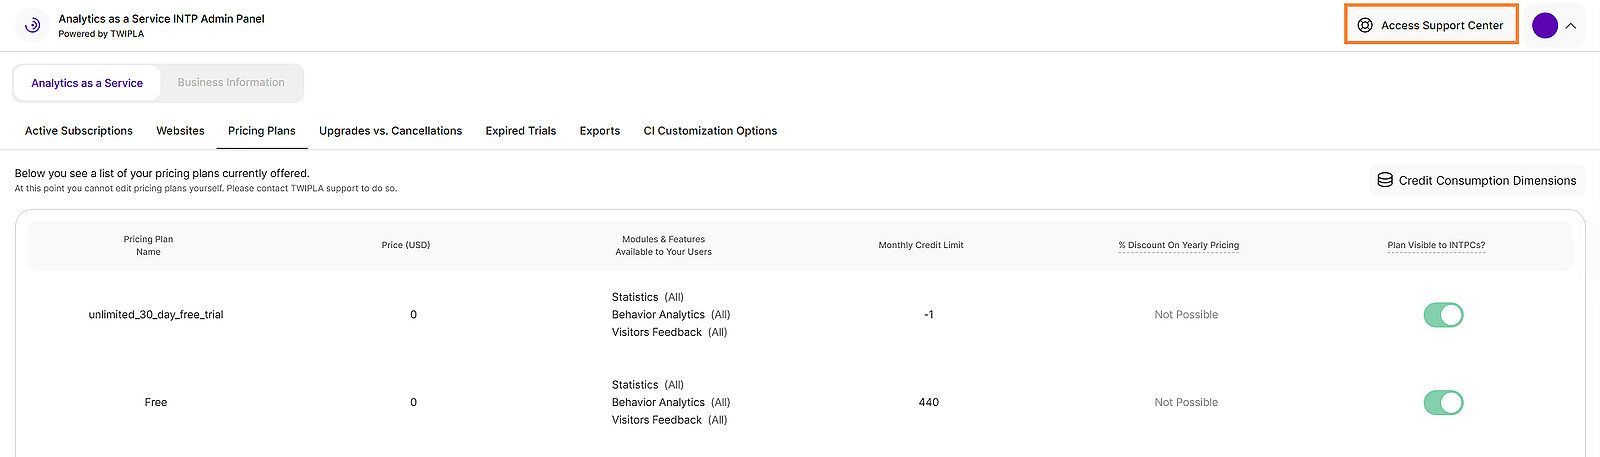
To simplify troubleshooting and feature discovery, you can access the Support Center via the Access Support Center button in the top right corner of the INTP Admin Panel. This provides immediate help while you manage platform settings, opening conveniently in a new tab to ensure your current work is not interrupted.
Active Subscriptions
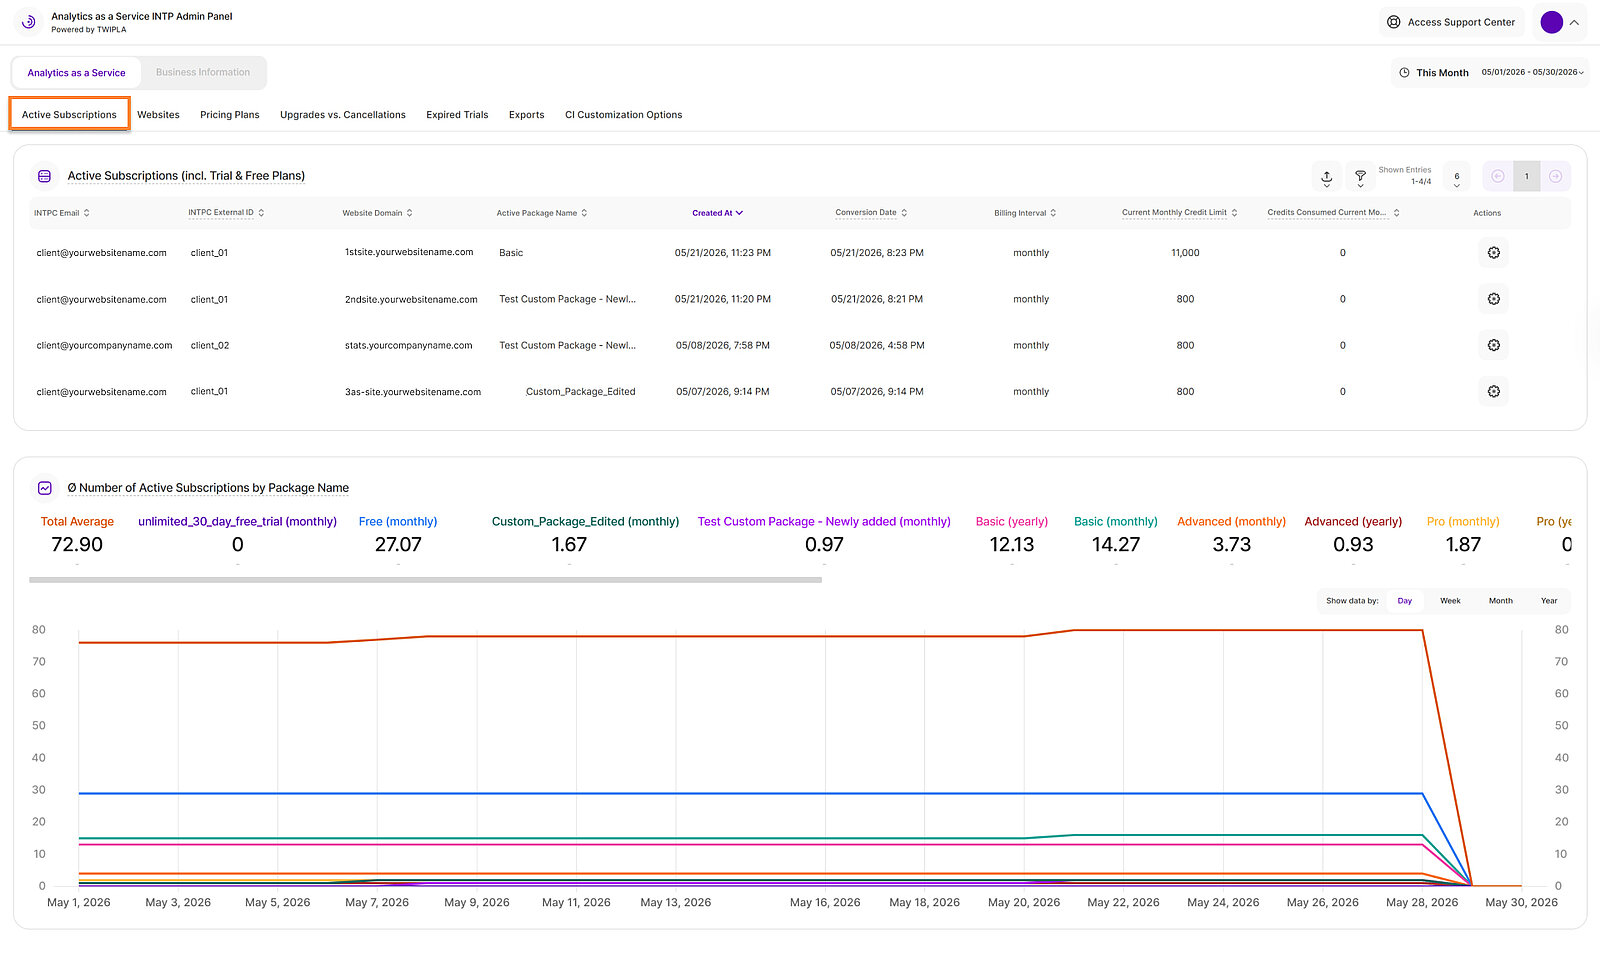
Before Reading: You will not be able to administrate subscriptions within the INTP Admin Panel if you are using our Stripe Integration to process your clients' payments. You will still see all information within the INTP Admin Panel though.
This section provides a comprehensive view of all active subscriptions for your INTPCs. Please note that any trial or free plans activated for your clients are included in this table, as they are technically categorized as subscriptions within the platform.
The Active Subscriptions (incl. Trial & Free Plans) table includes the following columns:
- INTPC Email: The primary email address linked to the subscription.
- INTPC External ID: The ID of the customer within the integration partner’s system.
- Website Domain: The specific URL associated with the subscription.
- Active Package Name: The name of the current pricing plan assigned to the subscription.
- Created At: The date and time the plan was created.
- Conversion Date:The date on which the client converted to a paid subscription plan.
- Billing Interval:The subscription billing frequency, either monthly or yearly.
- Current Monthly Credit Limit: The maximum number of credits available for the subscription's billing cycle.
- Credits Consumed Current Month: This represents the number of credits consumed by this subscription in the current billing month. A respective month's starting or ending date depends on the date the subscription was initiated by the user. On the first day of every new billing month, the value for credits consumed resets to 0, allowing credit usage to be tracked separately for each month.
- Actions: Functional shortcuts to manage or modify specific subscription details. You can view the subscription info, upgrade the subscription immediately or downgrade subscription at next billing cycle.
Below the table, you will find the Ø Number of Active Subscriptions by Package Name section. This report blocks show how many subscriptions were created for each package each day. It displays the average count for each package along with a total overall average.
Additionally, a line chart is provided to visualize the historical comparison between these packages over time. For more detailed analysis, you can group the chart data by day, week, month, or year.
Export Functionality for Active Subscriptions
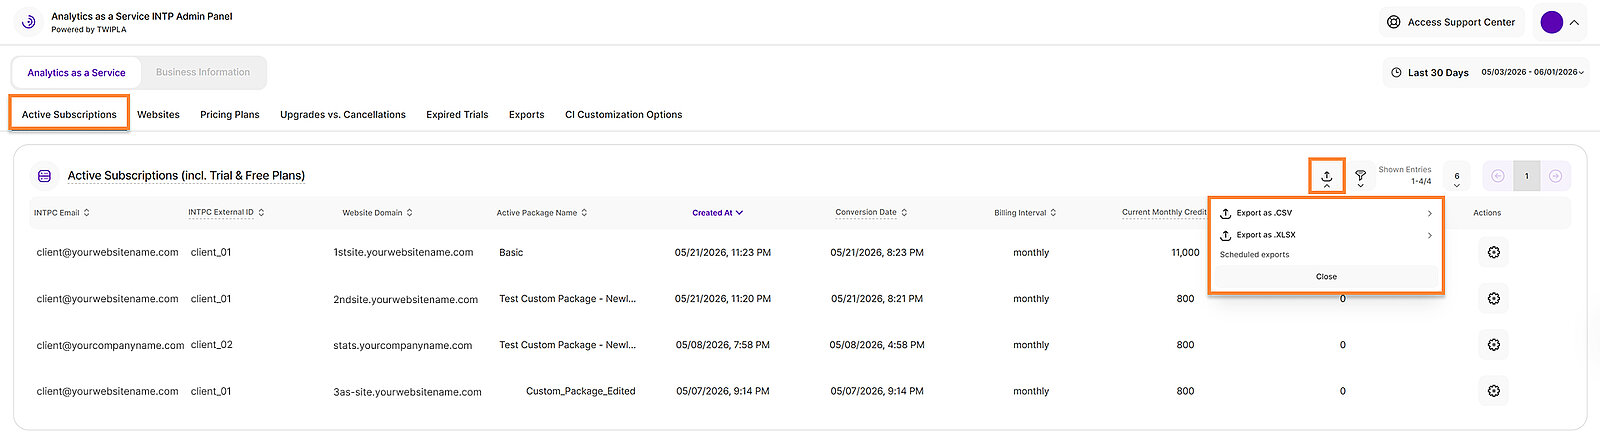
To improve data management and reporting, we have added an export feature to the Active Subscriptions tab that allows for the easy extraction of subscription data and refines how website information is displayed for account-based billing.
The data can be exported in both CSV and .XLSX formats, ensuring the resulting file includes all columns currently visible in the table and accurately reflects the data displayed at the time of export.
To provide clarity on which domains are associated with each subscription, the exported file includes a dedicated Website Name column. Furthermore, for account-based subscriptions, the Website domain column has been removed from both the user interface and the exported file to ensure a cleaner and more relevant view of your data.
Filters for Active Subscriptions

The table provides a variety of filters that allow you to narrow down the displayed data and perform more focused analysis of active subscriptions. The following filters are available:
- Billing Interval
- Credits Consumed
- Credit Limit
- INTPC Email
- INTPC External ID
- Is Converted
- Plan Name
- Pricing Plan ID
- Subscription Status
- Website Domain
These filters can be used individually or in combination to quickly locate specific subscription records and analyze subscription trends more effectively.
Websites
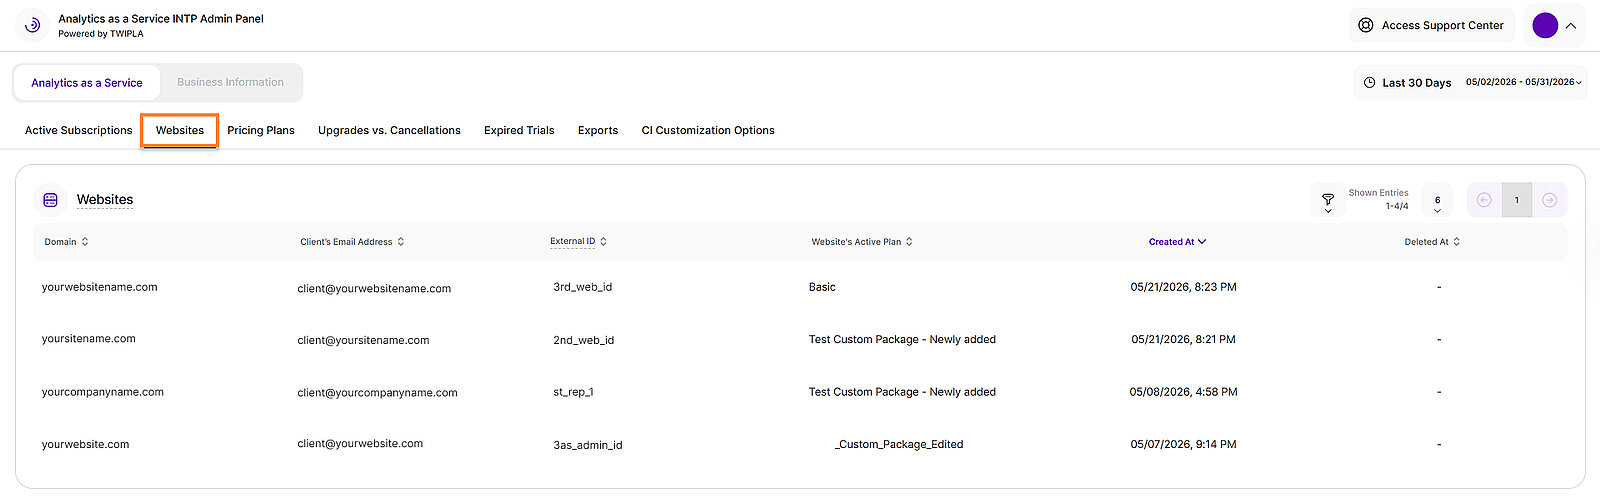
The Websites report block provides an overview of websites belonging to your clients. This view allows you to monitor user activity, verify subscription statuses, and navigate your client database efficiently.
The table is organized into three primary tabs to give you an immediate overview of each client:
- Domain: Lists the specific domain currently being tracked or managed by the client.
- Client's Email Address: Displays the primary email address associated with the website.
- External ID: Shows the ID of the website within the integration partner’s system. This is DIFFERENT from the INTPC ID.
- Website's Active Plan: Indicates the active subscription level for each account, allowing you to quickly identify free, trial, premium, or custom plan users.
- Created At: Displays the date and time the plan was created.
- Deleted At: Shows the date and time the plan was deleted.
To help you manage your data efficiently, you will find display and filtering options located in the top right corner. From this menu, you can refine your view by applying specific filters to your data, customize the number of entries displayed per page, and easily navigate through your records using the pagination controls.
Filters for Websites

The table includes a set of filters that help refine the displayed data for more focused analysis of website and subscription records. Filters can be used individually or combined to quickly locate specific records and identify trends across plans and account activity.
The following filters are available:
- Billing Interval
- INTPC Email
- INTPC External ID
- Is Deleted
- Plan Credits
- Plan Name
- Pricing Plan ID
- Subscription Status
- Website Domain
- Website External ID
Pricing Plans
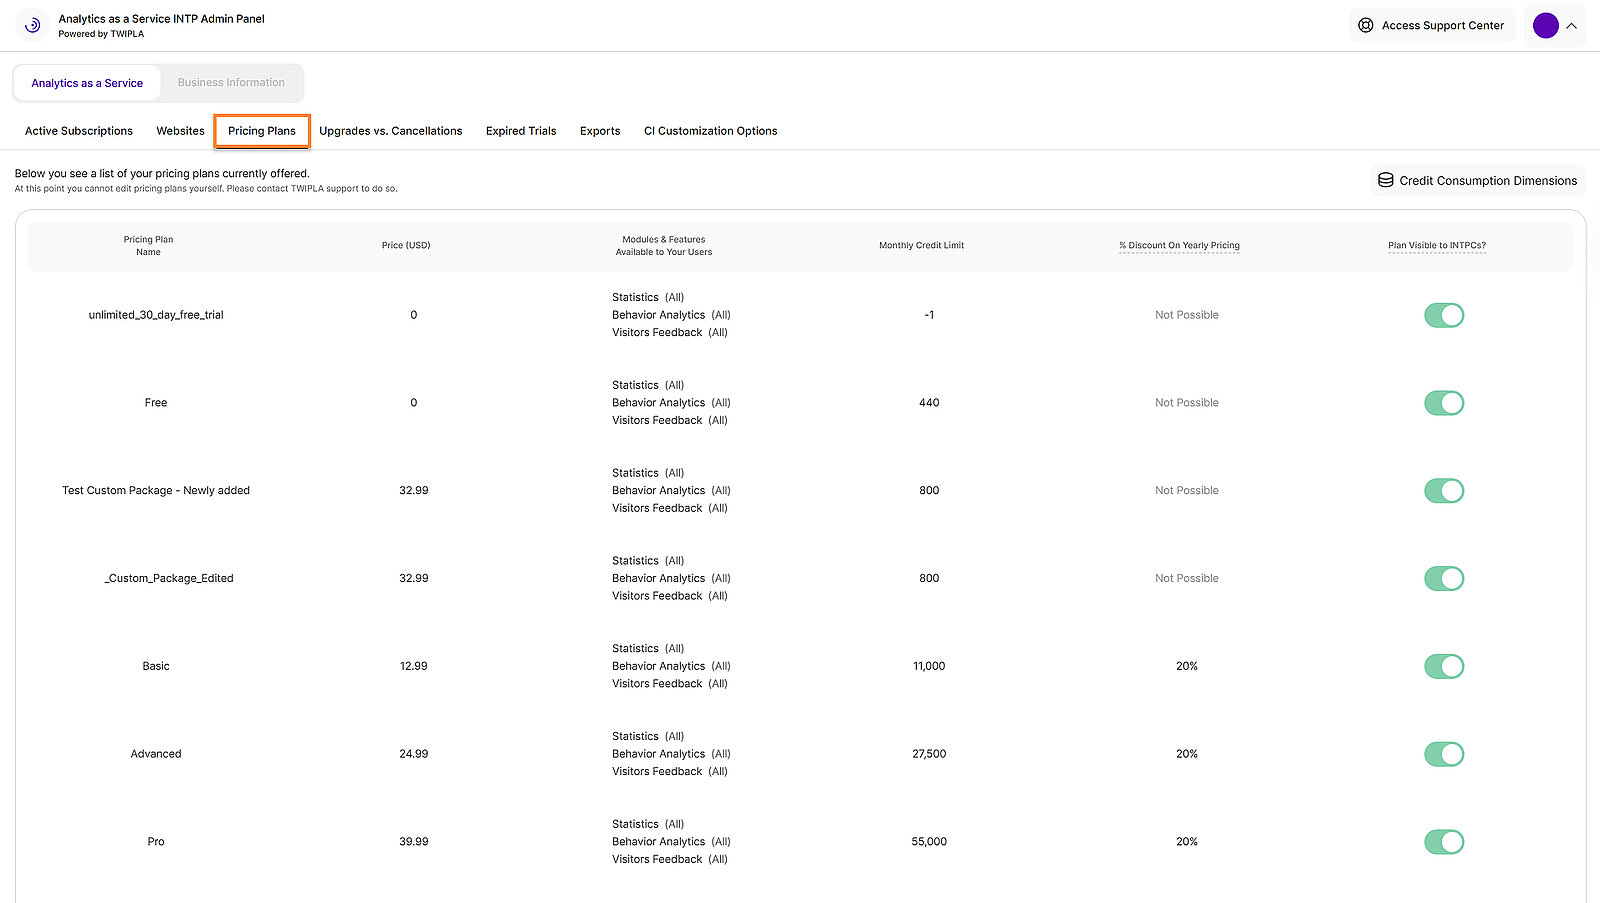
The Pricing Plans tab displays all the pricing plans that you asked TWIPLA to add to your account so that they can be offered to your clients. This section includes the following columns:
- Pricing Plan Name: Displays the specific name of the pricing plan you defined.
- Price (USD): Shows the plan's price you defined and its currency.
- Modules & Features Available to Your Users: Lists the specific modules and features included in each plan.
- Monthly Credit Limit: Specifies the total monthly credit allocation assigned to the pricing plan which was defined by you.
- % Discount On Yearly Pricing: Displays the discount offered when your clients opt for a yearly subscription. If you wish to update this discount percentage, please contact our support.
- Plan Visible to INTPCs?: Indicates whether the plan is currently visible to your clients. To un-display any of your listed pricing plans, please contact our support.
To view a detailed breakdown of credit usage, select the Credit Consumption Dimensions button located at the upper right of the table.
Important hints:
- In order to add or remove pricing plans, please generally contact our support.
- Pricing plans will also be displayed here, if you are using our stripe integration to process your clients' payments.
- If you want to administrate subscriptions (only available if you are NOT using our stripe integration to process your clients' payments) please click on the tab “Active Subscriptions”.
Upgrades vs. Cancellations
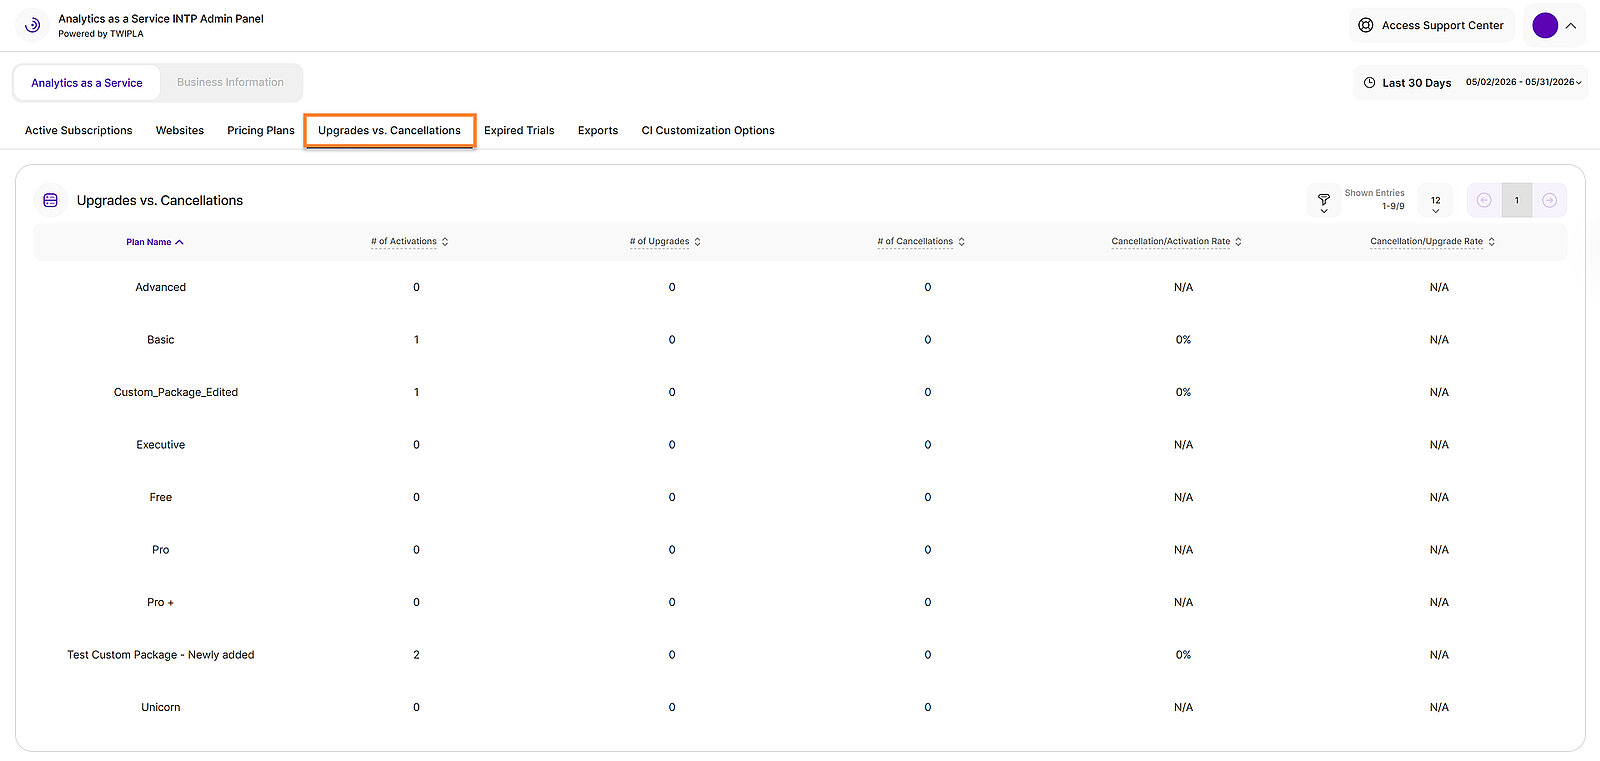
The Upgrades vs. Cancellations tab in the INTP Admin Panel provides a comprehensive overview of subscription activations, upgrades, and cancellations across different plans. This report enables INTPs to monitor customer plan behavior, compare upgrade activity against cancellations, and identify trends over time.
To better understand the data displayed in this dashboard:
- Activation occurs only once, when the subscription is initially created (when the website or client is created), and it can be created with a specific package.
- Upgrade is when the subscription already exists, for example on a free or lower-tier package, and the user moves to a higher-tier plan.
The report contains a table that displays the subscription data grouped by Plan Name and includes the following columns:
- Plan Name: Shows the name of the subscription plan.
- # of Activations: Displays the total number of plan activations.
- # of Upgrades: Displays the total number of upgrades associated with the plan.
- # of Cancellations: Shows the total number of cancellations.
- Cancellation/Activation Rate: Percentage rate between Cancellations and Activations within the selected timeframe. This metric may exceed 100% because cancellations can originate from activations that occurred outside the selected period.
- Cancellation/Upgrade Rate: Percentage rate between Cancellations and Upgrades within the selected timeframe. This metric may exceed 100% because cancellations can originate from upgrades that occurred outside the selected period.
Important Note: The data presented in this report is dependent on the selected time period.
Filters for Upgrades vs. Cancellations

The table includes multiple filtering options to help refine the displayed data and support more targeted analysis. Available filters include:
- Billed Amount
- Billing Interval
- INTPC Email
- INTPC External ID
- INTPC ID
- Plan Credits
- Plan Currency
- Plan Name
- Plan Price
- Pricing Plan ID
- Pro Rated
- Website Domain
- Website External ID
- Website ID
Expired Trials
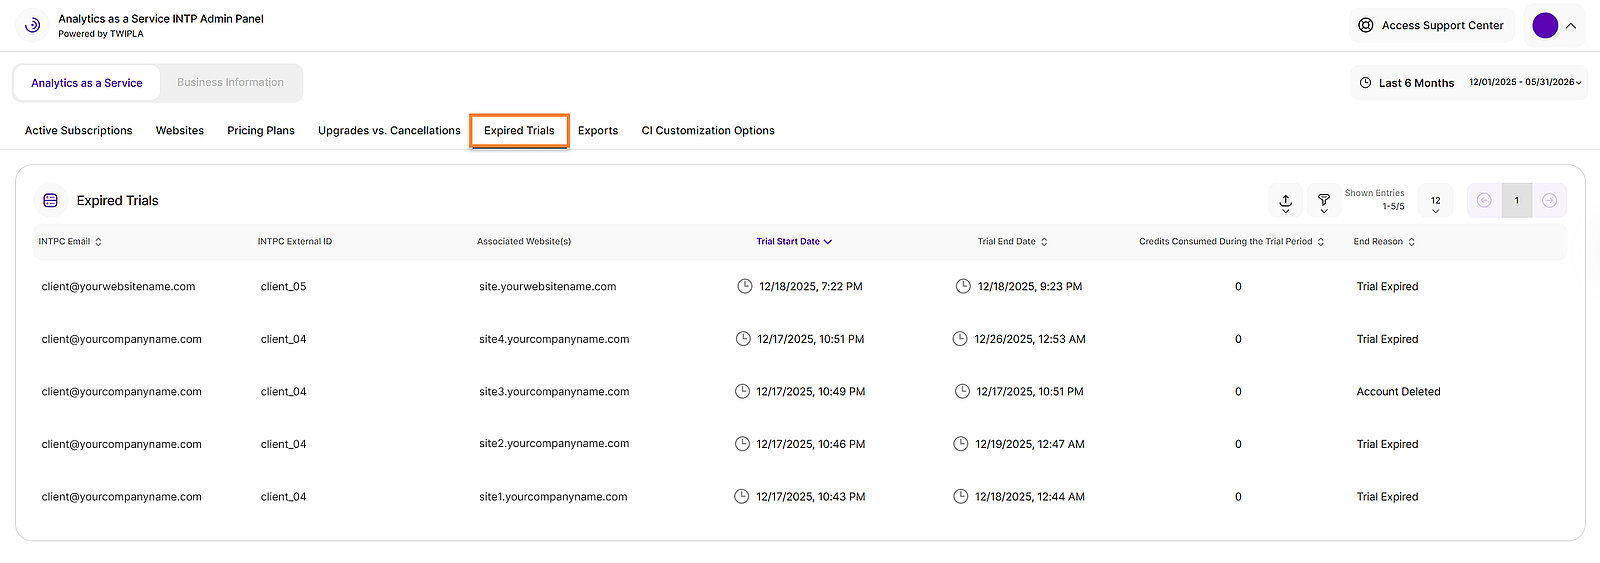
The Expired Trials tab provides a centralized view of trial accounts that have reached the end of their trial period. This report enables administrators to monitor expired trial accounts, review trial activity, and analyze usage metrics in a single location.
This report block includes the following information for each expired trial account:
- INTPC Email: The email address associated with the trial account.
- INTPC External ID: The external ID of the trial account.
- Associated Website(s): The website or websites linked to the trial account.
- Trial Start Date: The date when the trial period began.
- Trial End Date: The date when the trial period expired.
- Credits Consumed During the Trial Period: The number of credits used during the trial period.
End Reason: Indicates why the trial account was closed or ended. Reasons include:
- Trial Expired
- Subscription Upgrade
- Subscription Downgrade
- Account Deleted
To help you analyze and manage your data more effectively, the top-right corner of the report provides both export and filtering options. Use the available filters to narrow down the displayed data based on specific criteria, and export the results for further analysis or to share them with your team.
Export Function for Expired Trials

To enhance reporting and data management, an export feature is available in the Expired Trials tab, allowing you to easily download expired trial records for further analysis.
Data can be exported in both CSV and XLSX formats. The exported file includes all columns currently displayed in the table and reflects the data, filters, and sorting applied at the time of export, ensuring consistency between the on-screen view and the downloaded report.
Filters for Expired Trials

The Expired Trials report includes a set of filters that help INTPs narrow down results and focus on specific trial accounts. Filters can be applied individually or combined to perform more targeted analysis.
The following filters are available for this report block:
- Credits Consumed
- End Reason
- INTPC Email
- INTPC External ID
- Website Domain
Exports
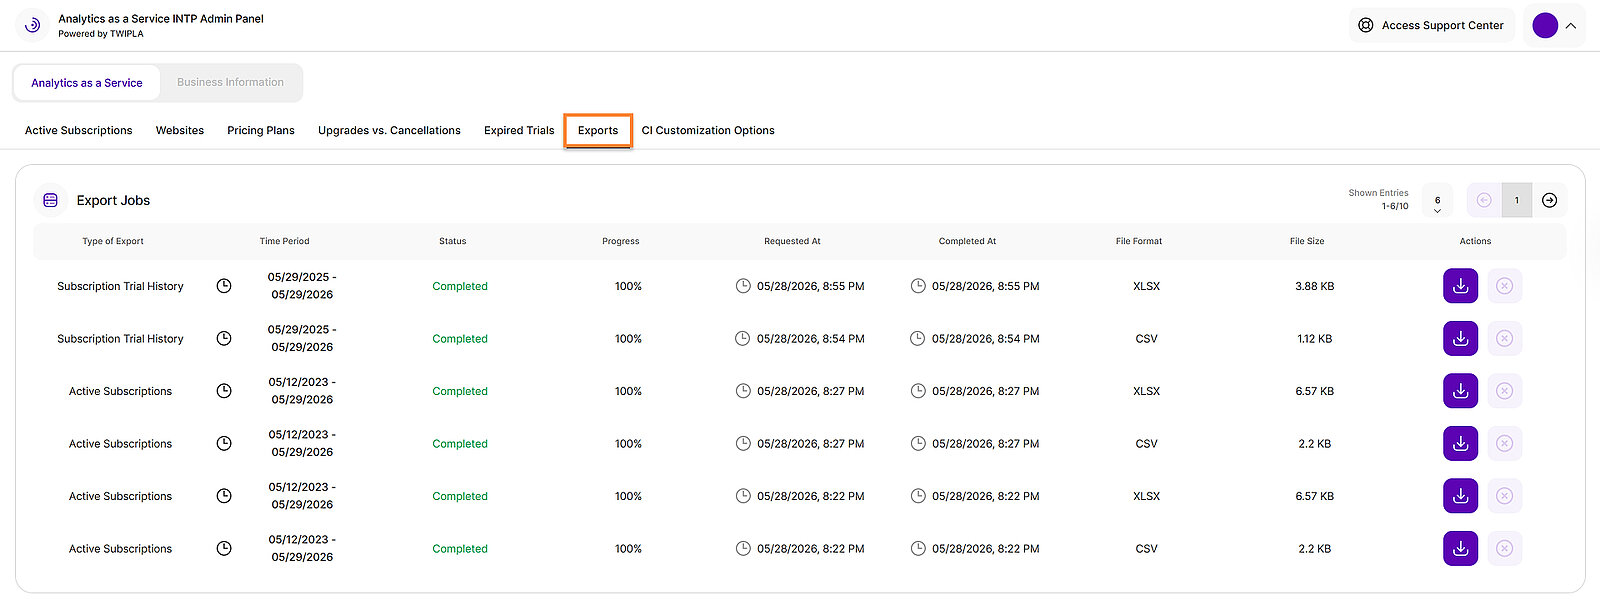
The Exports tab displays the history of all requested exports that were sent via email. If you need to re-download a file or cancel an export that is in progress, you can perform either action directly from this tab.
The table is consists of the following columns:
- Type of Export: Shows either Active Subscription or Subscription Trial History based on the type of data that you have exported.
- Time Period: The specific date range covered in the exported data set.
- Status: The current status of your export, either In Progress or Completed.
- Progress: Shows the percentage of completion for ongoing and completed exports.
- Requested At: The date and time the export request was submitted.
- Completed At: (Appears only for completed exports) The date and time the export was finished.
- File Format: The format you chose for the exported data, either CSV or XSLX.
- File Size: The size of the downloaded file.
- Action: Shows two options - Download File or Cancel export.
CI Customization Options
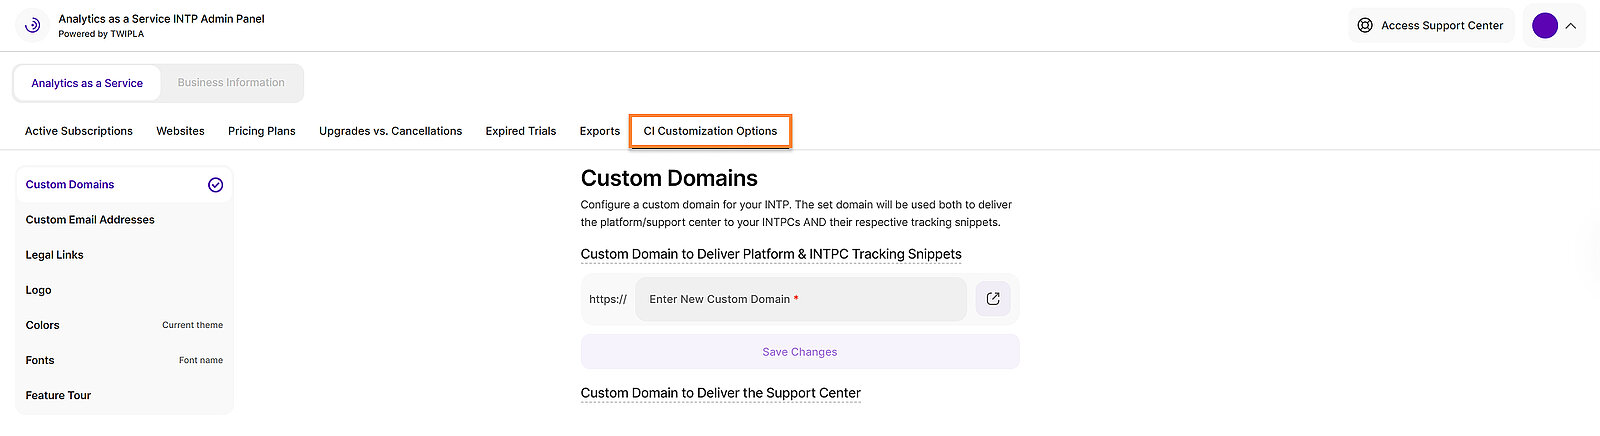
The CI Customization Options section provides the essential tools for tailoring the platform to match your brand. The interface is organized into the key modules shown below:
Custom Domains
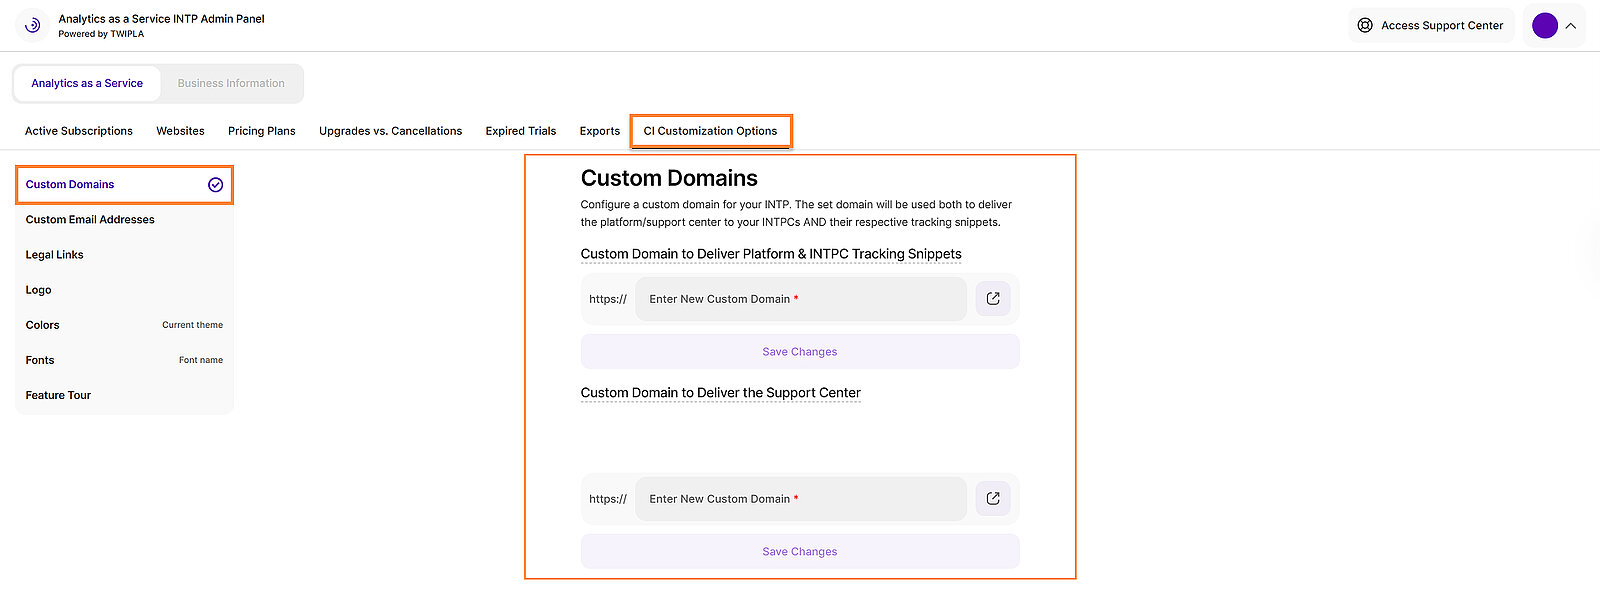
Here you are able to configure a custom domain via which…
- … the platform and default tracking snippet …
- … support center …
… will be delivered to your INTPCs (= Integration Partner Clients).
For a comprehensive guide on this topic, please refer to our Custom Domains Setup Guide.
Custom Email Addresses
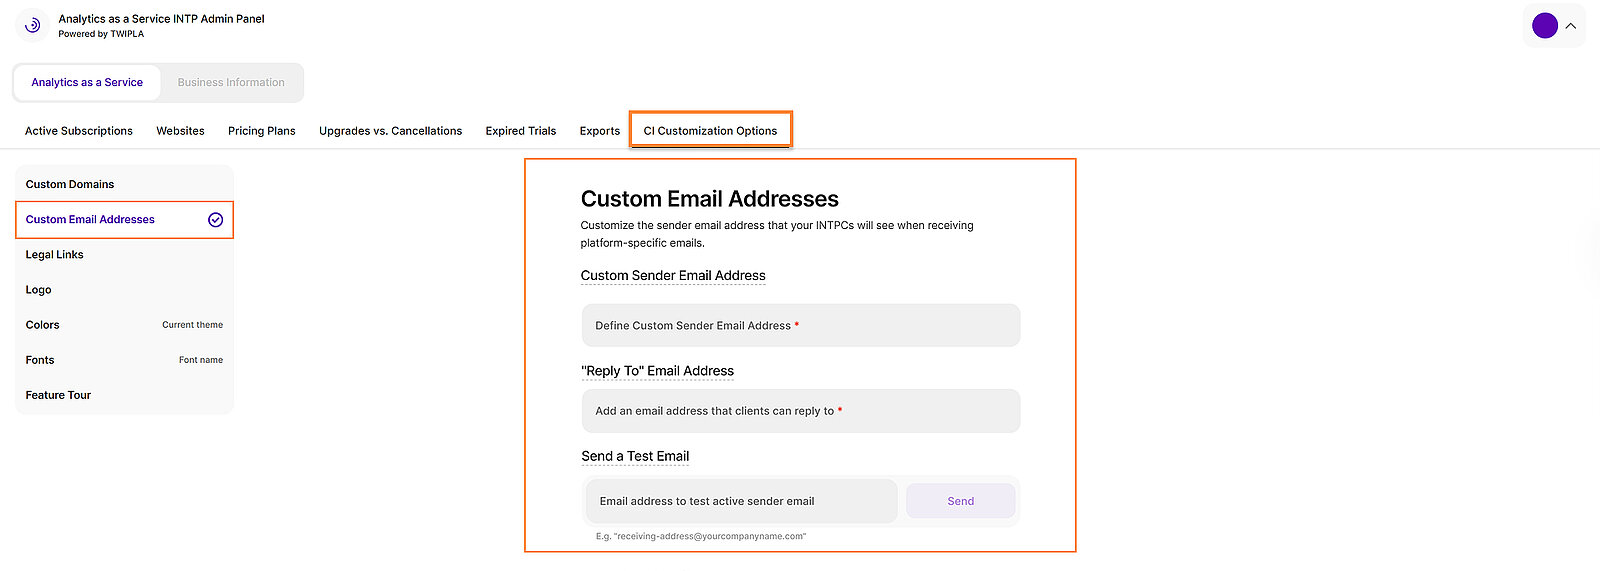
Customize the sender email address that your INTPCs will see when receiving platform-specific emails. For a comprehensive guide on this topic, please refer to Custom Domains Setup Guide > Custom Email Addresses.
Legal Links for INTPCs
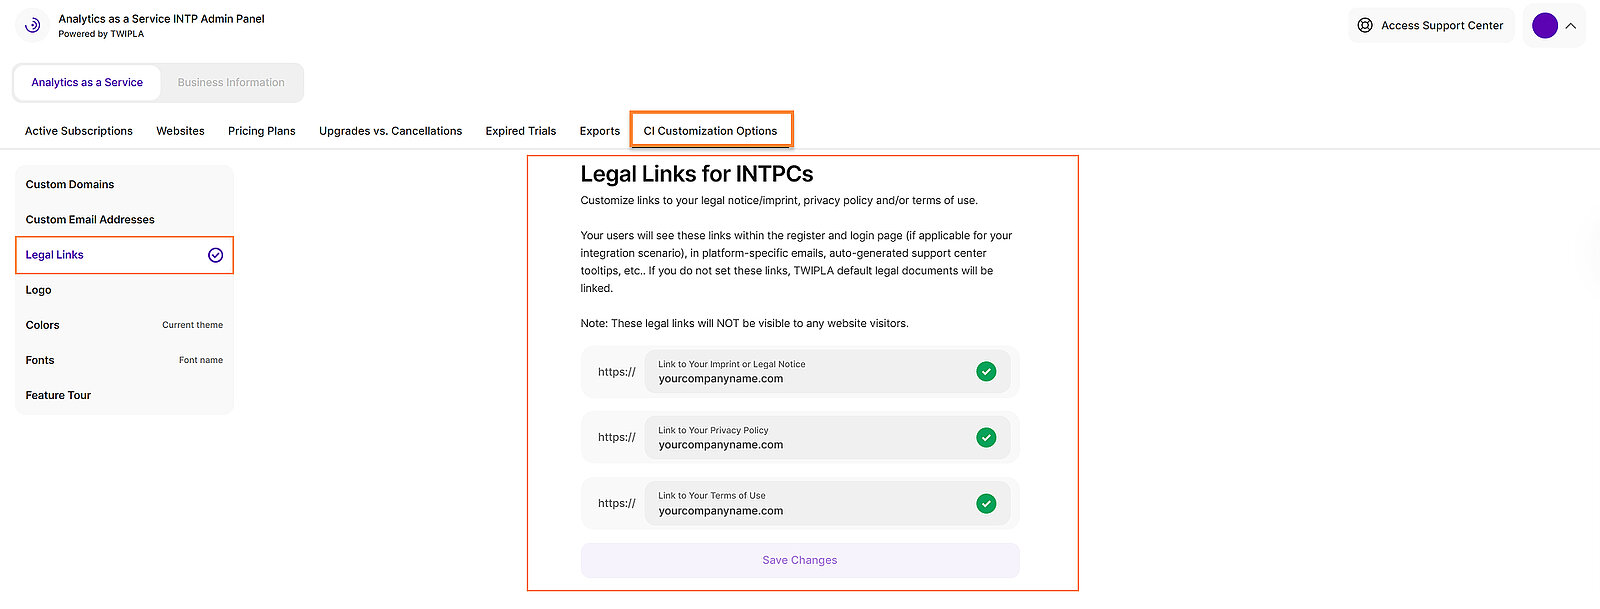
If desired, you can customize links to your legal notice, privacy policy, and terms of use which will be displayed to your INTPCs in respective contexts across the platform.
Your users will see these links on the registration and login pages (where applicable to your integration), within platform-specific emails, and in auto-generated support center tooltips. If you do not provide custom URLs, the platform will link to our standard legal documents by default.
Note: These legal links are intended for platform users only and will, of course, not be visible to any of your website visitors.
To apply your settings, simply paste the desired links into the corresponding fields and click Save Changes.
- Link to Your Imprint or Legal Notice
- Link to Your Privacy Policy
- Link to Your Terms of Use
Account Logo
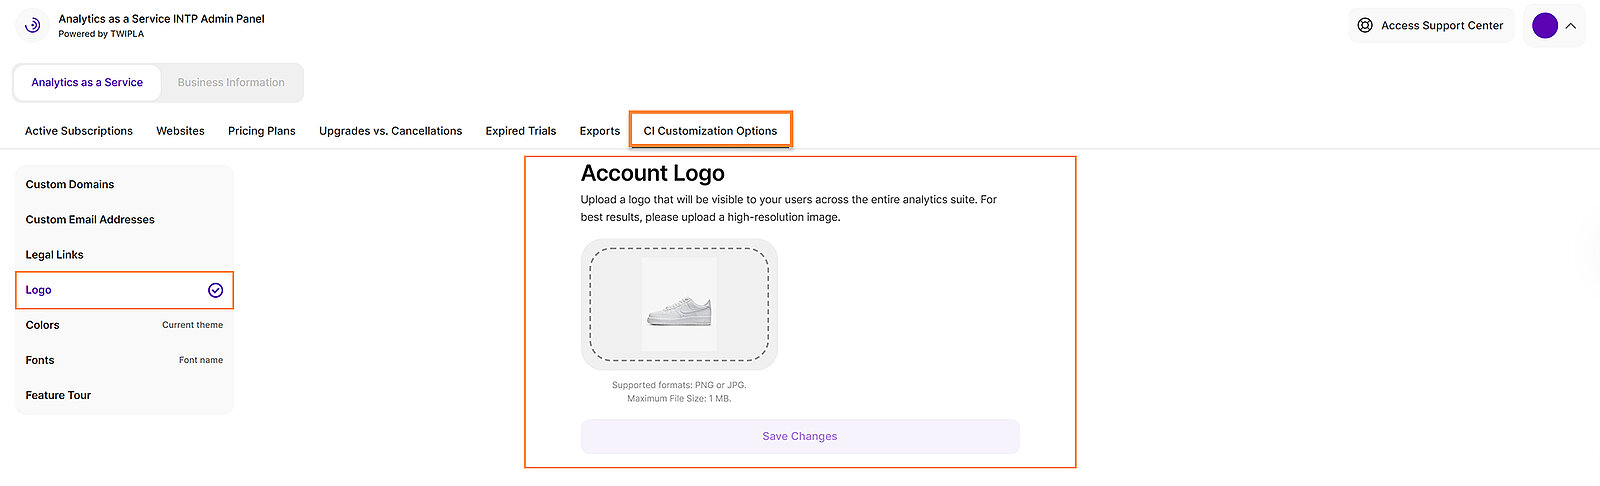
Upload a logo that will be visible to your users across the entire analytics suite. It is shown within the platform's header.
For best results:
- Upload a high-resolution image.
- Supported formats: PNG, JPG or SVG.
- Maximum file size: 1 MB.
Colors
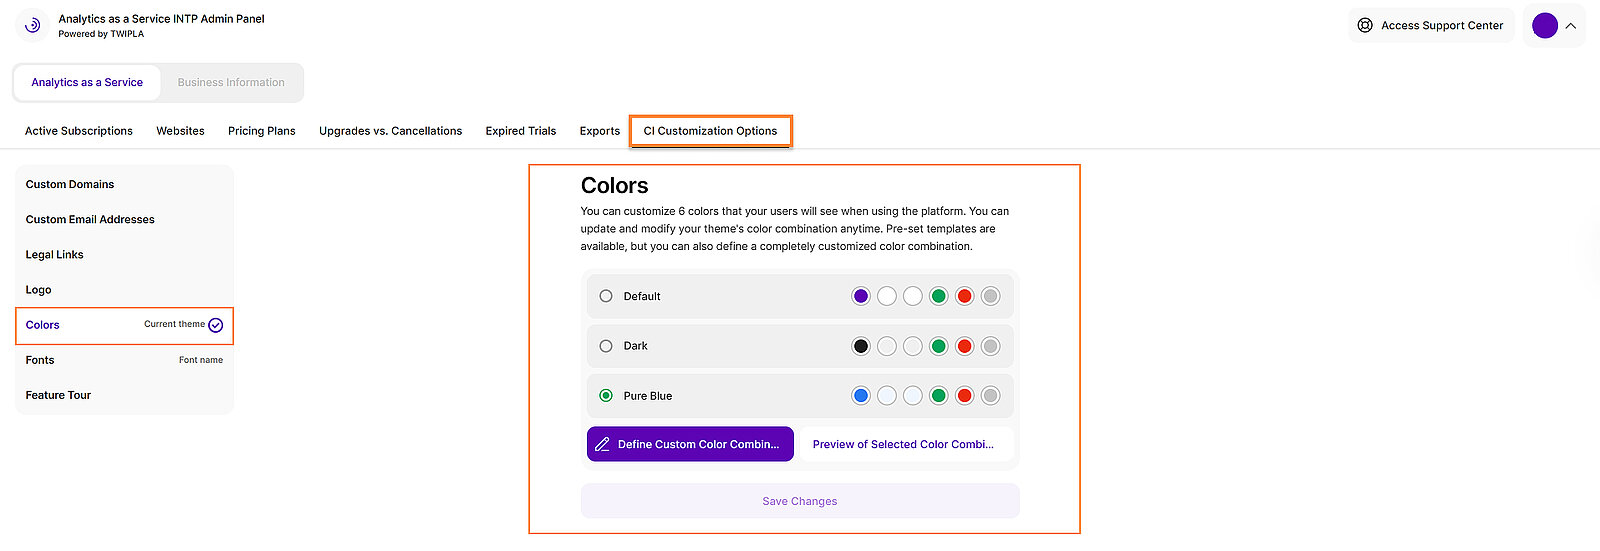
You can customize 6 color options that your users will see when using the platform. You can update and modify your theme's color combination anytime. Three pre-set templates are available, yet you can also define a fully customized color combination.
To set up a custom color combination:
- Click Edit Custom Color Combination.
- Enter the hex code for your desired color or select a color using the color picker given the described context.
- Click Save Changes to apply your new color settings for the white label theme.
To visualize/preview your changes, click the Preview of Selected Color Combination button. The preview will show you exactly which elements and metrics each color is applied to. Click Close Preview to exit the window.
Fonts
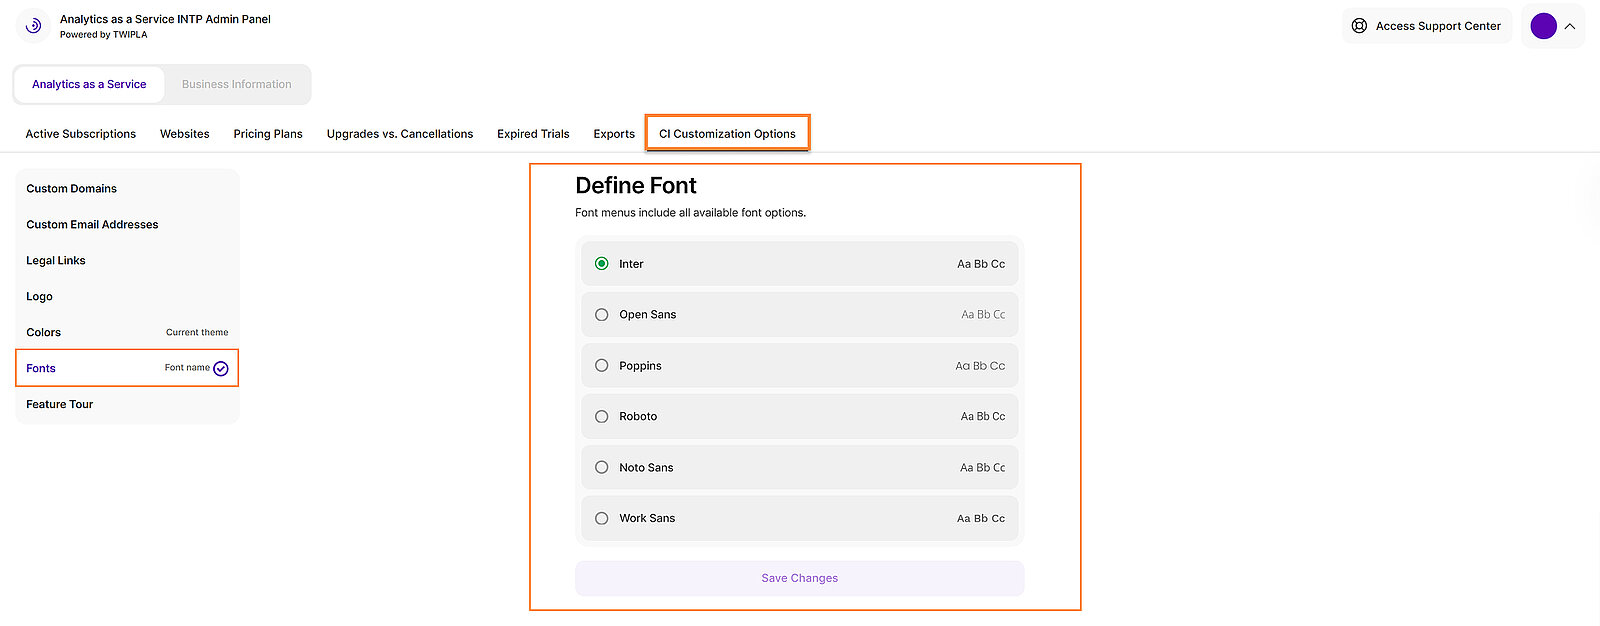
Define the font to be used within the entire analytics suite presented to your users. You have six fonts to choose from:
- Inter
- Open Sans
- Poppins
- Roboto
- Noto Sans
- Work Sans
Simply select the font you want, and click Save Changes to apply your settings.
Feature Tour
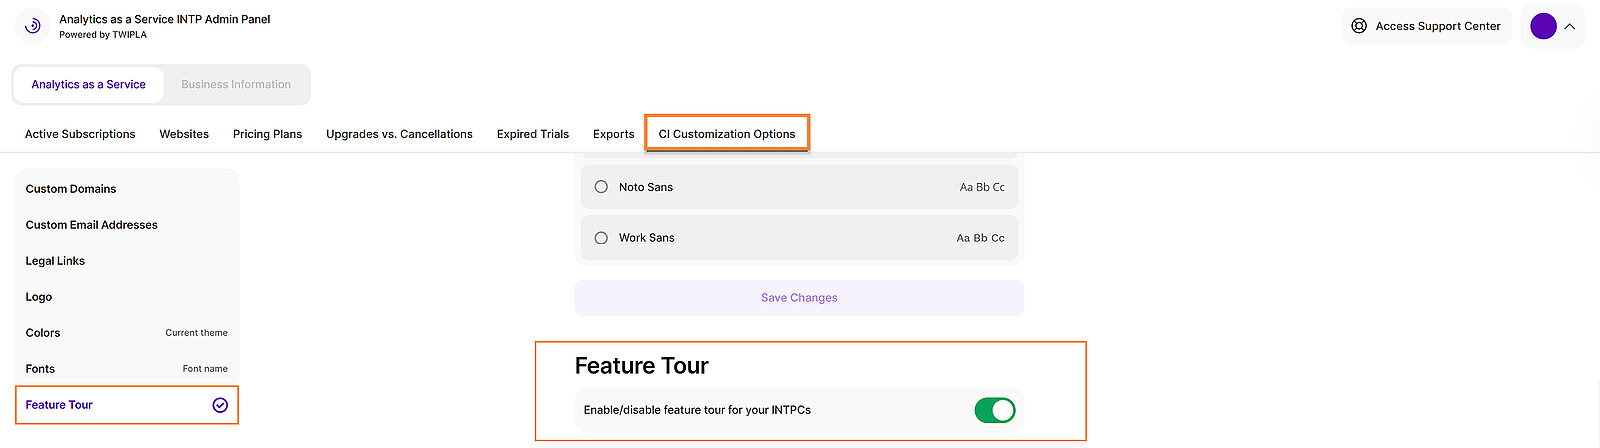
Use the toggle switch to enable or disable the automated feature tour for your INTPCs. This onboarding tool provides a guided walkthrough of the platform to help your clients familiarize themselves with the interface and core functionalities. Currently the tour cannot be customized.
