
- First Steps Checklist
-
Frequently Asked Questions

-
All About Features
- How to Install the Tracking Code
-
User Guides
-
Integrating With Other Platforms
-
Legal, Data Privacy & Certificates
- TWAIA Addendum
- White Label Analytics
- Glossary
- Contact
Account Settings
All You Need to Know About Your Account's Settings
What It's All About

Manage your most important account settings here.
Note: Once you have selected a web page in the upper left corner of the user interface, you can access the corresponding settings via the icon at the bottom of the vertical menu.
In the "Account Settings" view, you can add or update your personal and business data, manage your account web pages, create/administer a white label theme and apply it to selected account web pages, or view invoices.
On the top right of the screen, you'll find the AI Assistant (TWAIA) button. TWAIA was specially developed to improve your user experience. Simply ask questions about topics such as website data, support issues, etc.
Managing Your Account Info

In this view you can add or edit your personal and business data (e.g. if you want to activate white labeling for your account so that your employees/customers know who you are).
The following aspects can be managed in this section:
Note: To easily return to the previously selected website, we have added the “Previous website” button at the top left. With just one click, you can now easily return to the last website you were working on.
Personal Data

Your personal account information is located in the "Personal Data" section of My Account. Here, you can view and manage your email address, password, and preferred name.
To change your email address, click the pencil icon next to "Email". You'll be asked to enter your current password for verification. After confirming your identity, you can enter your new email address in the provided field.
To strengthen your account security, you can change your password by clicking "Change Password". You'll need to enter your new password twice and confirm it. A password strength indicator will help you choose a strong password.
Another way to update your personal data is by clicking the Edit Information. From there, you can easily modify your email address and name. Don't forget to click "Submit" to finalize your changes.
Important Hint: Keep in mind that changing your email address or password will update your login credentials, so be sure you have the updated information on hand.
How did you find us?

We're curious to know how you stumbled upon us. Could you please tell us by selecting an option from this dropdown under the "How did you find us?" section. Your answer helps us tailor our marketing and reach more people like you." These are the available options:
- Google / Bing
- Social Media
- Webinar / Event
- Community
- Review Sites
- Newsletter
- Word of mouth
- Other
Business & Billing Data

The Business & Billing Data section under My Account is designed for maximum clarity and ease of management. The list of data fields displayed on the main screen precisely matches the fields available in the modal that appears when you click Edit Information.
To update or add your business and billing information, click the Edit Information button.
Only four fields are mandatory: company name, first name, last name, and country.
You can also provide your company's website, business address, and VAT identification number (if applicable).
Additionally, there are three dropdown menus to describe your business:
- Business Type: Select the category that best describes your business.
- Solopreneur
- E-Commerce
- Agency/Consultant
- Non-Profit Organization
- Public Sector
- Software/Tech
- Business Size: Indicate the size of your business by selecting the appropriate range.
- 1-10
- 10-50
- 50-250
- 250-1000
- >1000
- Business Sector: Select the sector that most accurately represents your business.
- Administration & government
- Architecture & engineering
- Arts, media & entertainment
- Business & finance
- Cleaning & maintenance services
- Community & social services
- Construction
- E-commerce
- Education
- Farming, fishing and forestry
- Food, Restaurants & Hotels
- Healthcare
- IT & Technical
- Legal services
- Management
- Production
- Sales
- Transportation
- Other
Note: If you encounter a "Something went wrong!" error, please check all entered fields. The most common cause is an invalid URL entered in the Company Website field.
Account Notifications

You can choose between the following notifications to your account email address:
- Our monthly newsletter
- Platform tips, tricks, & promotions
You can change these settings at any time.
Account Options

If you have added several websites to your account, you can specify which website should always be selected as the default when you log in by selecting the preferred default website.
You can also delete your account completely in this section. Please note that you can only do this after you have removed all websites individually from your account to prevent accidental account deletions. Existing account information or website data can NOT be restored after deletion.
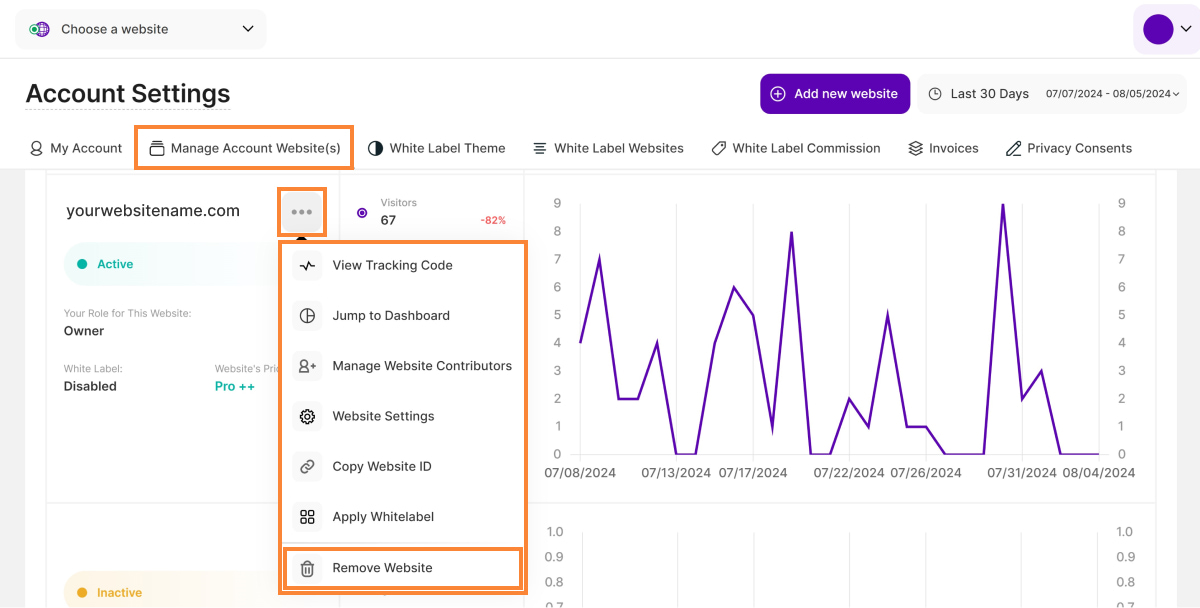
Managing Your Account Websites

This tab provides a comprehensive overview of your connected websites, offering critical insights into their status, performance, and your role.
The websites can be easily filtered by their tracking code status or by URL using the filter icon on the top right corner.
The first section displays website tiles. Essential details for each site are explained below:
- Website URL: The full URL of the linked website is displayed here. Clicking on the URL will redirect you to the corresponding Main Dashboards of the website.
- More Options menu: Clicking this icon shows the following options:
- View Tracking Code: Selecting this redirects you to Website Settings > Tracking Code. Here you can find all tracking code information, including: Manual Snippet Installation and Install as Native Plugin. You can also retrieve and copy the tracking code if needed.
- Jump to Dashboard: Quickly navigate to the Main Dashboards to view your website statistics.
- Manage Website Contributors: Selecting this redirects you to the dedicated page where you can manage all contributors (colleagues, collaborators and/or clients) for your website.
- Apply Sumo LTD: Use this option to apply the AppSumo plan to the selected website. The status will display Applied once the plan is active.
- Website Settings: Select this to quickly access the website's General Settings such as email reports, domain whitelisting, etc.
- Copy Website ID: Instantly copy your Website ID e.g. to make an integration with Google Tag Manager possible (just copy the website's ID and fill in the required field when installing our platform via GTM) or manually install our app on your Weebly website.
- Apply Whitelabel: Select this to apply the White Label theme to your website. If the white label theme is already active for this website, the option Disable white label will be displayed instead.
- Remove Website: Use this option to permanently delete this specific website and all associated data. This action cannot be undone. Note: Accounts with a role other than Owner cannot remove the website. They will only see the option Leave Website.
- Tracking Code Status: Displays the current status of the website tracking code installation (whether data is being collected or not).
- Active: The tracking code is installed correctly and visits are being tracked. Websites running on Wix will display WIX on the right side of the status.
- Inactive: The tracking code is missing or incorrectly installed in your website's source code, which prevents the platform from tracking visits.
Important Note: A website can show an Inactive status even though you installed the tracking code correctly. Please either visit the website yourself (if you have not excluded your own visits from tracking) or wait for the first visit to happen on your website. The status should change to Active afterward. To check whether the tracking code has been installed correctly, you can always hover on the red or green dot icon at the top left corner within the header (once you select the website).
- Your Website's Role:Shows your current contributor role for this website.
- Owner, Website Editor, Website Watcher or Custom Dashboard Viewer.
- Owner, Website Editor, Website Watcher or Custom Dashboard Viewer.
- White Label Status:Indicates the status of the White Label feature.
- Enabled: The custom White Label theme is applied to that website.
- Disabled: No white label theme has been activated for this website.
- Active Pricing Plan: Displays the name of the pricing plan on which the website is currently running. If it is a Wix website, only a "View on Wix" link will be displayed. Click on the link to manage the website plan directly in your Wix account. Note: Plans are color-coded based on their subscription status: green for active and orange for expired, ended, or canceled. If the plan color is orange, clicking on it will take you to the "Upgrade Plan" screen.
The next section highlights your website's five key metrics: Page Views, Sessions, New Visitors, Total Visitors, and Converted Sessions.
You can control the visualization by selecting or deselecting these metrics to display them on the graph on the right. You can reveal additional information by hovering your cursor over any data point on the graph.
Important Notes:
- If your role for a specific website is not Owner, some details or options might not be available for you
- All the data shown in the graphs is based on the time period selected in the date picker.
- If a website was added at a later time, you might see empty graphs for the current range. To see data for the desired website, ensure you select an applicable date range that covers its activity.
Adding a New Website

To add a new website, click the Add new website button on the upper right corner of the Account Settings.
You'll be redirected to this onboarding screen.
When adding a new website to your account, you must select the suitable website source. Follow these steps to select the platform on which your website was built:
- If you built your website with Wix or Weebly, choose the appropriate button. You will then be sent to the Wix or Weebly dashboards. If you want to know how the application can be added to a Wix or Weebly website, please click here and select the corresponding platform. The Wix or Weebly website will then be added to your account after that.
- If you built your website with WordPress or any other HTML-website, select No, I Don't Use Any Platform From Above. In the second step of the onboarding process, you will be prompted to enter the URL of your new website. If you require further assistance with installation, please refer to our dedicated support section here.
Deleting a Website
Deleting a website permanently removes all data associated with it. This process cannot be undone. Data cannot be recovered once the deletion is confirmed.
Important Note: To perform this action, you must be the owner of the website.
Step-by-step Deletion Process
- Select the website you want to remove and click the More Options menu.
- Choose Remove Website (look for the trash icon) at the bottom of the list.
- A confirmation request will open. You can choose to receive all your data by email before deleting the website from your account. A backup file will be sent to you by email within a few days. The duration depends on the amount of data collected on the website to be deleted.
- For verification, you will be required to enter your current password to finalize the permanent removal of the website.
Different Roles & Adding Contributors to a Website

The platform defines four primary contributor roles:
- Website Owner: This role has full access to the platform, and cannot be removed by any other user. The Website Owner can manage all the settings including:
- Adding/deleting contributors.
Managing subscriptions, and legal documents.Updating privacy settings.
- Website Editor: This contributor can manage most website settings, except:
- Cannot delete/reset website data.
- Cannot update subscription settings.
- Cannot create/edit/delete polls, surveys, custom dashboards, API keys.
Cannot manage contributors.
- Website Watchers: This role has read-only access to dashboards and reports.
- Cannot modify, add, or delete any content.
- Restricted from viewing:
- Custom Dashboards
- API Keys
Subscription details
- Custom Dashboard Viewer: This role is strictly limited to viewing custom dashboards assigned to them. To view any further website data, the user must be explicitly added to a custom dashboard, or they will encounter the error: "Missing Access to Any Dashboard".
- Cannot interact with filters or modify any settings.
Cannot navigate to other platform areas outside the custom dashboard view.
Important: When the White Label theme is enabled for a website, its following contributor roles are restricted from the specific areas mentioned below:
- Website Watcher: No access to TWAIA, Help & Support, Privacy Center, and Website Settings.
- Custom Dashboard Viewer: No access to TWAIA.
Manage Website Contributors

When you select Manage Website Contributors, you are taken to a dedicated page that gives you complete control over who accesses your website data and what permissions they have.
As the website owner, you can invite and assign roles to contributors, each with varying levels of access:
- Website Editor: Can make edits to the website, including content updates and structural changes.
- Website Watcher: Has view-only access to the website’s data and cannot make edits.
- Custom Dashboard Viewer: Can view (not edit) all website’s custom dashboards that were shared with them. They cannot view or edit any other platform's content or settings.
The table displays all the website contributors’ names and email addresses on the left, and their current roles on the right.
You have the flexibility to select and modify roles for each contributor, giving you full control over their permissions and access levels. Simply click the dropdown menu next to their name and select the new role.
Adding and Removing Users
- Adding a New Contributor: Go to the Add a New Contributor section, enter the email address of the person you would like to invite, and specify their desired account role. Click the Invite Contributor button to send the invitation.
- Removing a Contributor: To remove a contributor, click the respectivesymbol next to their name.
Pending invitation(s) can be viewed in the lower-right corner of this view. This list shows the email address and the contributor role. If you need to cancel an invitation, simply click the respectivesymbol icon.
You can efficiently manage your contributor data by filtering the list by the Contributor Name or Email address. Furthermore, you have the ability to customize the number of entries shown per page and easily navigate through the data using the pagination controls.
White Label The Platform

With the white label feature, you can offer your customers the entire platform under your own brand. This allows you to fully customize the dashboard and provide your customers with a personalized interface that perfectly matches your business.
Activating the White Label Feature

To get started, all you need is a customer account. No specific pricing package is required. You only need to create a white label theme once, and you can then activate it for all account websites that you own.
Simply follow these steps:
- Add all your (clients') websites to your account.
- Activate your white label theme for a website by navigating to your account settings. Click on the "White Label Theme" tab and use the options provided to create your own custom theme. You can only create one theme per account.
- Once you have successfully created your white label theme, click on the "White Label Websites" tab and activate the theme for all desired account websites using the corresponding switch in the "White Label Theme" column.
- After setting up the white label theme, you can now add your clients and other contributors, who will also see the platform based on all your white label settings.
Important Note: You must be the owner of a website to activate a white label theme for it.
Managing Your White Label Theme

To edit your white label theme, go to the "White Label Theme" tab in your account settings. The following options are available to you.
Important Notes:
- The white label theme is only applied to websites that you have explicitly selected for it.
- If a user was already a contributor to a website for which you have activated the white label theme, this contributor can now only access the statistics for this website via the (sub)domain defined in the white label theme. The corresponding website will also disappear from the user's "standard account" (where all websites for which no white label theme has been activated will continue to be displayed).
- When a white label theme is deactivated for a website, all existing contributors associated with that website are removed for technical reasons. The website owner can, of course, invite all contributors back to the website afterwards.
Custom Domains
You have two options for setting up the domain that your contributors will use to access the platform for whose website(s) you have activated the white label theme. Both options allow your contributors to log in and access their website analytics in a fully branded experience:
Important Notes:
- The newly set custom domain will only affect the domain via which the platform is delivered.
- To use a custom domain for your Support Center, simply enter the custom domain in the field below.
- The custom domain won't affect the website’s snippet.
- The admin can only choose to either activate a custom subdomain or a fully custom domain for the white-label theme. Confirming one, will deactivate the other option automatically.
- Only admins can apply a white-label theme to a website.
Define a Custom Subdomain

Set your custom subdomain from which contributors of a website for which white labeling was activated will login and access their statistics & analytics.
This option is divided into two sections:
Custom Subdomain to Deliver Platform: Here you have the option to manually enter a subdomain and select a main domain from the list we provide. This subdomain will then be automatically used for invitations sent to contributors of websites for which the white label theme has been activated. Registration and login also take place on this custom subdomain.
Click Save Changes to save the settings. You can copy the link to share it with relevant people.
Support Center URL: This is the automatically generated domain where contributors to websites for which you have enabled your white label theme will find the corresponding support center. The support center is automatically linked in the help texts of the platform for the websites for which you have activated the white label theme. If you want to customize the domain through which the support center is to be provided, you can do so using the "Custom Domains" option.
The support center's content is always automatically kept up-to-date.
Define a Custom Domain

In this tab, you can set up your custom domain from which contributors of a website for which white labeling was activated will login and access their statistics & analytics. This option is divided into two sections.
First, we have Custom Domain to Deliver Platform, where you can set up a completely custom domain that your clients can use to log in to the platform.
Here's how to configure your custom domain:
- Activate the White Label theme for any respective client website under Account Settings > White Label Websites.
- Enter the new custom domain then click Save Changes.
- You will be redirected to the Confirm Custom Domain Change modal. To verify your newly added custom domain, you need to add the CNAME record displayed with your domain registrar or DNS provider.
- Once the DNS record is correctly configured, the platform will automatically verify the setup and prepare everything needed. This process may take anywhere from a few minutes up to 24 hours — click Verify DNS to continue.
- After completion, the platform will be live on the new domain. Your clients can log in using their existing credentials.
Second is Custom Domain to Deliver the Support Center. Once you activated a white label theme for a website, all website’s tooltips will only contain links linking to a white label support center. Here you can define a custom link for that white label support center. The support center's content is always kept up-to-date. Simply enter the new custom domain and click Save Changes to save the settings.
Custom Email Addresses
Customize the sender email address that contributors of white-labeled websites will see when receiving platform-specific emails. At the same time you can also set a “Reply-To” email address. There are two options here:
"Reply To" Email Address

Here you can define the email address to which contributors will automatically reply to when receiving mail from the platform for white-labeled websites. It has two sections:
- "Reply To" Email Address: Define the email address to which contributors will automatically reply to when receiving mail from the platform for white-labeled websites. Follow these steps to set it up:
- Add an email address in the field "reply to email address". It should be the address which your websites' contributors should actually see when receiving emails from the platform.
- Click Confirm ‘Reply To’-email address to save the changes.
- Send a Test Email: You can send a test email to see exactly how the reply-to address will appear to your contributors. For the most accurate test, use a different email address than the one you just entered.
Custom Sender Email

You can now set up a custom sender email address that will be shown to your clients when they receive emails from the platform. Use the following tabs to set it up:
- Custom Sender Email Address: Set up a custom sender email address which will be shown to your clients when receiving emails from the platform.
- Define your custom sender email address by adding the email address in the text field below.
- Click Save Changes to apply the settings.
- You will now be prompted to update your domain’s DNS settings. This includes adding required DNS records like SPF and DKIM to ensure secure and trusted email delivery.
- Once your DNS settings are correctly configured, the platform will automatically verify the setup.
- After completion, the email address will become active and used to send system emails from your domain.
- Send a Test Email: You can test how the custom sender email address appears to your contributors by sending a test email. For best results, use a different email address than the one you've entered above, so you can properly see how it looks from the recipient's perspective.
Legal Links for White Label Clients

Add links to your legal notice/imprint, privacy policy and/or terms of use.
Contributors to websites with the white label theme enabled will see these links in platform-specific emails, automatically generated help texts from the support center, etc. If you do not define these links yourself, the platform's standard legal documents will be linked.
Note: These legal links are of course NOT visible to external visitors to websites, but only to users of the platform itself.
Account Logo
Upload a logo that will be visible to all contributors of those websites for which you have activated your white label theme. You can define alt text for your uploaded logo, which will be displayed if the image cannot be loaded.
For best results:
- Upload a high-resolution image.
- Supported formats: PNG, JPG or SVG.
- Maximum file size: 1 MB.
Colors

You can customize six colors that contributors of white-labeled websites will see when using the platform. You can update and modify your theme's color combination anytime and as often as you like. Three pre-set templates are available, and you can also define a fully customized color combination.
To set up a custom color combination:
- Click Edit Custom Color Combination.
- Enter the hex code for your desired color or select a color using the color picker.
- Click Save Changes to apply your new color settings for the white label theme.
To visualize your changes, click the Preview of Selected Color Combination button. The preview will show you exactly which elements and metrics each color is applied to. Click Close Preview to exit the window.
Fonts

Define the font to be displayed within the platform for websites with your white label theme activated. You have six fonts to choose from:
- Inter
- Open Sans
- Poppins
- Roboto
- Noto Sans
- Work Sans
Simply select the font you want, and click Save Changes to apply your settings.
Managing Your White Label Websites

On this tab, you can easily determine for which of your account websites you want to activate your white label theme.
- Website: All website URLs associated with your account are displayed here. You can only activate your white label theme for websites that you own. If you do not have access to certain websites or lack access rights, please contact the website owner.
- Website Data Tracking: Indicates whether data tracking is currently Active or Inactive.
- White Label Theme: This column contains a toggle button that indicates whether your white label theme is enabled for the website or not.
- Pricing Plan: Shows the active pricing plan associated with the website.
- Contributors: Displays a list of all contributors to the website. Active contributors are represented by colored circles, while pending contributors are represented by gray circles with a number indicating how many people have been invited but have not yet accepted.
- Your Role: Displays your current role as a contributor to the website.
On the top right of the table, you'll find a filter icon that allows you to Search by URL or White Label Status. You can also customize the number of entries shown per page and easily navigate through the data using pagination.
To make the White Label Theme setup process simple, we've prepared a comprehensive, step-by-step checklist for you. You can DOWNLOAD THE SETUP GUIDE HERE to walk through the setup easily!
Strategic Partner Commission

Once you have marked an account website as third party and purchased at least one paid package for it, you can monitor your commissions via the "Commission Strategic Partners" tab.
The tab displays a table with the following columns:
- Website: Only those website URLs for which you are the owner and therefore have the right to apply the separately created white label theme will be displayed here.
- Tracking Data: Indicates whether data collection for a website is active or inactive.
- 3rd Party Website: Enable this button to mark the website as a third-party website and receive a 30% commission on future payments. Note: This does NOT enable the white label theme for this website. To enable white label features, go to the tab White Label Websites.
- Pricing Plan: Shows a website's active pricing plan.
- Estimated Commission Claim: The amount displayed is an estimate of the commission amount you are entitled to for a specific website. A website must be marked as a "third-party website" AND have an active premium subscription. Commission claims are valid as long as a website meets the two criteria above.
- Options: If a website can be upgraded to a higher package, you will see the option "Upgrade to a higher plan!". Clicking on this will take you to the upgrade screen.
In the upper right-hand corner of the table, you will see another button labeled "Estimated total commission entitlement." This shows the estimated total commission amount that you are potentially entitled to. If you click on it, you will receive more detailed information, including:
- Payout Frequency
- Estimated Annual Commission
- Recent & Upcoming Payouts
Due commission payouts need to be confirmed by our partner department. They are executed on a quarterly basis and only happen after having received your payment request via Paypal and an invoice containing due commission amounts to the address listed in the Estimated Commission Claim window.
The table can be filtered by URL search or white label status. You can also adjust the number of entries displayed per page and easily navigate through the data using pagination.
Important Notes:
- By signing up as a Strategic Partner, you unlock an up-to 30% lifetime commission on every third-party website subscription linked to your account and gain complete flexibility over pricing. Check our Strategic Partner Program to learn more about how to join.
- If a website already had an active premium subscription BEFORE it was marked as a "third-party website," commission will only be counted starting from the next payment cycle.
Managing Your Invoices

View invoices for each domain connected to your account. Note that each domain can be on a different pricing plan.
The data is organized into the following columns:
- Billing Date: Date that the invoice has been created.
- URL: Refers to the URL of the website this bill refers to.
- Amount: The billing amount in USD (further currencies will be available soon).
- Status: Status of the payment (paid, unpaid, etc.).
- Download: Need a copy of your invoice? Just click the download icon next to it. You'll be able to view the invoice as a PDF and save it to your device.
Important Notes:
- These invoices only refer to "non-Wix websites". The billing for Wix websites is done separately on Wix.
- This view includes all invoices from all websites added to your account. If you want to have a list of only website specific bills, please go to Website Settings > Subscription > Invoices.
Managing Your Privacy Consents

We use YouTube to play videos (i.e. explanation videos of features), which are directly embedded within the application. When you revoke the option to play embedded YouTube elements, we will most likely show you a version that is stored on our website. In this case, you will not be able to see comments or any other video interactions. You can also always watch the videos directly on Youtube.
Account Settings for Wix

Account Settings has now been added for Wix users and is easily accessible through the user profile dropdown menu. This new feature provides a centralized location to manage your account details and privacy preferences. It contains two tabs:
My Account
This section allows you to manage your personal information, business and billing data, and notification preferences.
How did you find us?

We added a new dropdown wherein you can select the option that best describes how you first found out about our platform. In this way, you can help us to better understand where our users come from.
- Google / Bing
- Social Media
- Webinar / Event
- Community
- Review Sites
- Newsletter
- Word of mouth
- Other
Account Notifications

You can choose between the following notifications to your account email address:
- Our monthly newsletter
- Platform tips, tricks, & promotions
You can change these settings at any time.
Business & Billing Data

Wix users can now manage their business and billing information, similar to standalone accounts.
To add or update your details, simply click the Edit Information button. The modal that opens contains the same fields found in the standalone website account settings.
Privacy Consents

We use YouTube to embed video tutorials directly into our application to provide a seamless user experience. If you disable this option, we will provide you with an alternative version of the videos on our website - outside of the platform itself.
Important note: The alternative version may not contain comments and other video interactions. You can also always watch the videos directly on YouTube.