Simon Coulthard October 15, 2026
- [Book a Demo)
- Default Events vs. Custom Events
- When should you track a custom event?
- How to track custom events in TWIPLA
- 1. Make sure Event Tracking is enabled
- 2. Create your Custom Event Tag
- 3. Add the Custom Event Tag to your website
- JavaScript event listener
- 4. Test your Custom Event
- 5. Analyze what happens around the event
- Manage your generated Custom Event Tags
- Where else can you track custom events on your website?
- How to track custom events that actually matter
How to Track the Website Interactions That Matter With Custom Events

So, why track custom events?
Page views show you where visitors go, and those insights have their value. But they don't always tell you whether those visitors actually did the things that matter to your business.
Did someone submit a demo request? Download a key resource? Finish registration? Use a specific feature on your site?
That's where custom event tracking comes in.
TWIPLA lets you set up custom events for specific interactions, so those actions carry real meaning in your reports. Instead of just seeing that someone clicked or engaged with something, you can define exactly what that engagement represents.
In this guide, I'll walk through how to track custom events in TWIPLA, using a lead-generation form submission as our main example. But before going further, it's worth being clear about what "custom events" actually means at TWIPLA.
Our Event Tracking module covers three types of interaction:
- Default Events, which TWIPLA tracks automatically;
- Alarming Behavior Events, like rage clicks, dead clicks, and U-turns, which flag friction on your site, and;
- Custom Events, which you define yourself to capture the specific actions that matter to your business.
This guide focuses on that last category — how to set up and use Custom Events to track the interactions your default tracking doesn't already handle on its own.
Custom Events are also designed to work alongside TWIPLA’s wider behavior analysis tools. Session Recordings can show you the behavior surrounding an interaction, Heatmaps reveal broader engagement patterns, and Conversion Funnels help place important actions within the journey toward an outcome.
Note for Wix-based users: This guide focuses on Custom Event Tags. In TWIPLA for Wix, the Event Tracking module currently only offers Tracked Auto Events and Alarming Behavior Events for the time being.
→ Subscribe to the Newsletter
Stay up to date with TWIPLA. Get product updates, practical insights, and industry news delivered to your inbox.
Need Help With Event Tracking?
If you need help setting up Custom Events or have questions about your TWIPLA configuration, contact our support team. Or, if you’d like a guided look at how TWIPLA can help you understand and improve your website, book a demo.
Default Events vs. Custom Events
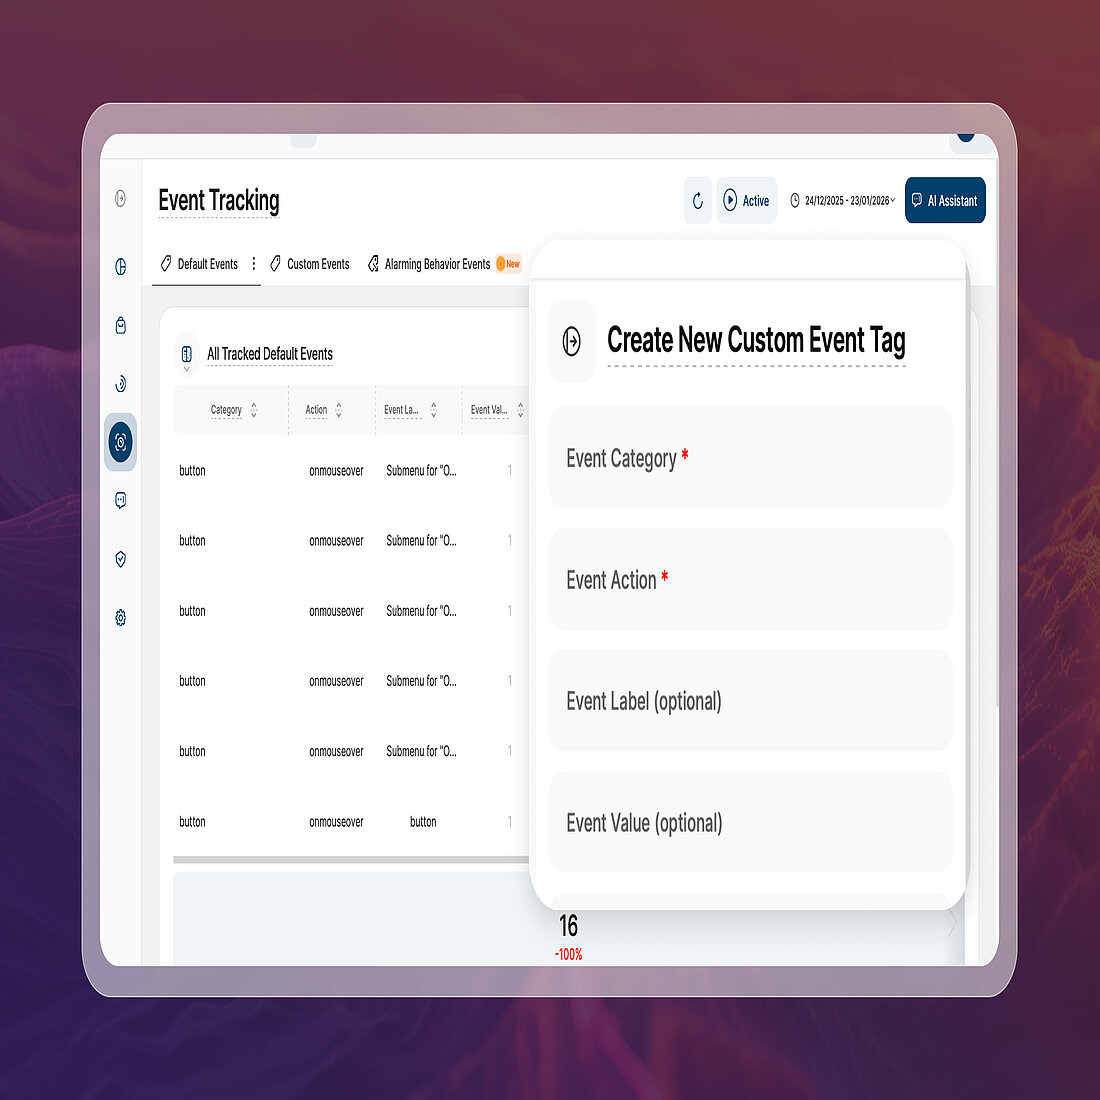
Before you create a Custom Event Tag, check whether TWIPLA is already tracking that interaction on its own.
TWIPLA's Default Events can automatically capture common interactions with page elements like buttons, input fields, select fields, text areas, radio buttons, and checkboxes.
No coding needed for these. Just make sure Auto-Track Default Events is enabled in Module Settings, then pick which elements and browser actions you want monitored.
Custom Events are a different animal.
A Custom Event Tag lets you define a specific interaction yourself, describing it in terms of what that action means for your business.
For instance, knowing someone interacted with a form is fine. Knowing they submitted a Book a Demo form can be far more useful.
So you don't need to manually tag every little thing. Default Events handle the routine stuff automatically, while Custom Events add meaning to the interactions you specifically care about.
When should you track a custom event?
Custom event tracking makes sense when an interaction represents something meaningful you want to separate from general site activity.
Think about a lead-generation form.
You might already know visitors reached the page with the form or clicked into individual fields. But if the page exists to generate demo requests, the real question is whether anyone completed that action.
Creating a Custom Event for the submission lets you spot it directly in your event tracking data.
Other useful Custom Events might include:
- downloading a report, brochure, or other resource;
- completing a registration;
- interacting with a specific website feature;
- submitting a particular contact form;
- finishing an important step in a visitor journey.
The point isn't to create as many events as possible. It's to identify interactions that answer useful questions about how your site is performing.
How to track custom events in TWIPLA
Let's use a Book a Demo form submission as our worked example.
1. Make sure Event Tracking is enabled
Start by going to Visitor Behavior → Event Tracking.
If this is your first time opening Event Tracking, TWIPLA will show a welcome banner. Click Let’s Get Started, then use the red paused button in the top-right corner to activate Event Tracking.
If you’ve opened Event Tracking before, you may already have dismissed or completed this onboarding. In that case, it’s worth double-checking the setting manually. To do this, go to Website Settings → Module Settings and make sure Track Manually Created Event Tags is enabled. If this setting is off, Custom Event Tags that fire on your website won’t be collected or appear in your reports.
This setting is separate from Auto-Track Default Events, so you can control automatic and manually configured tracking independently.
2. Create your Custom Event Tag
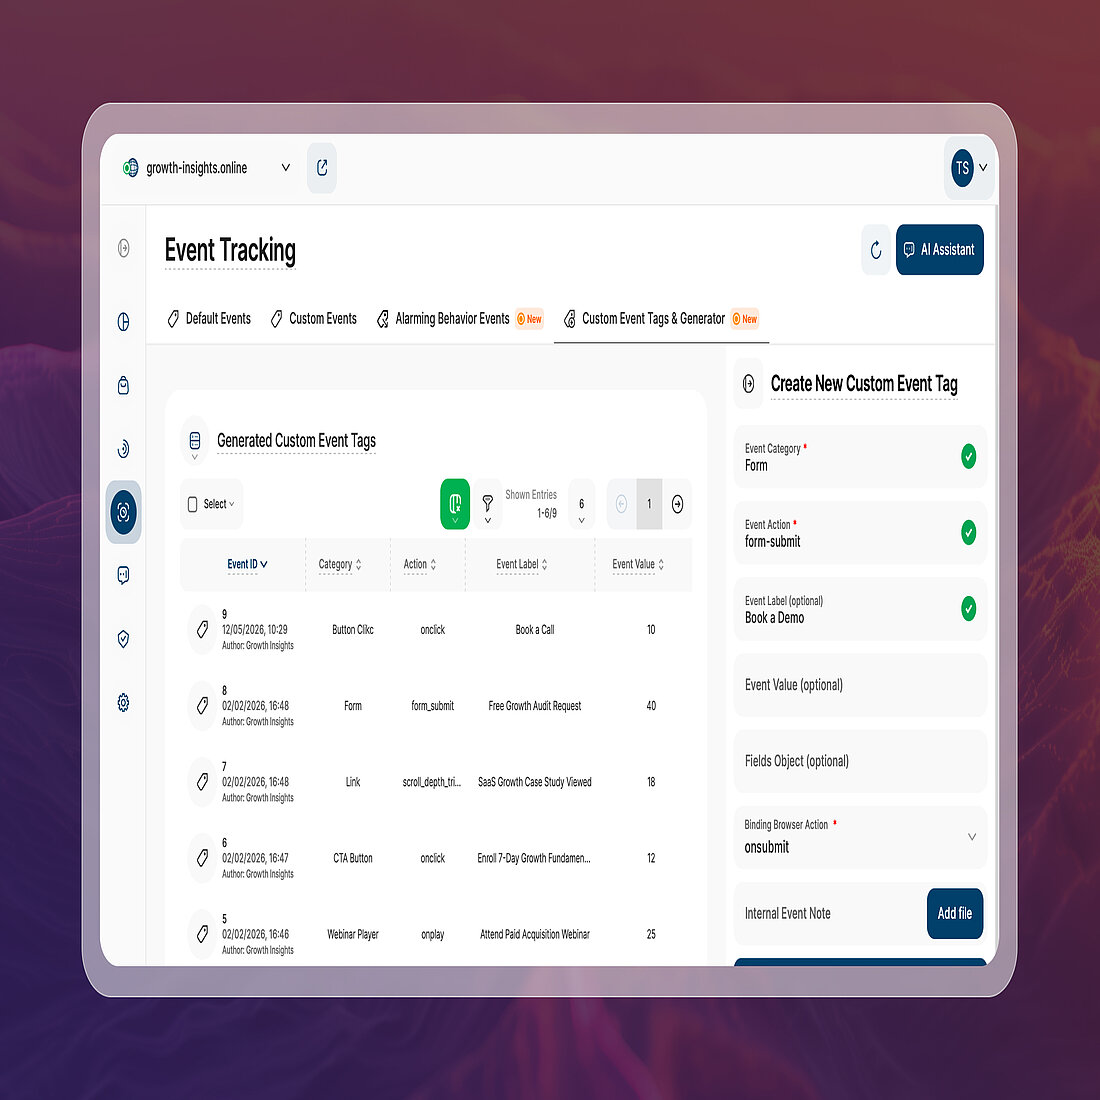
Next, go to:
Event Tracking → Custom Event Tags & Generator
The Custom Event Tag Generator lets you define the interaction you want to track.
For our Book a Demo example, we could set it up like this:
| No. | Field | Example |
|---|---|---|
| 1 | Event Category | Form |
| 2 | Event Action | form_submit |
| 3 | Event Label | Book a Demo |
| 4 | Event Value | N/A (left blank) |
| 5 | Fields Object | N/A (left blank) |
| 6 | Binding Browser Action | onsubmit |
| 7 | Internal Event Note | Book a Demo lead form |
Event Category
You must add an Event Category to organize the event at a high level. A consistent category structure becomes particularly useful if you create multiple related Custom Events later. Here, Form describes the broader purpose of the interaction.
Event Action
You must also add an Event Action. It describes what actually happened and will also enable you to distinguish this event from other actions within the same Form category. We've chosen: Form_submit.
Event Label
The Event Label is optional and lets you identify the specific element or interaction more precisely. For this example, we're using Book a Demo. If you have several lead-generation forms, labels can help tell a demo request apart from a contact request, quote request, newsletter signup, or another form.
Event Value
The Event Value is optional and lets you attach a numerical value to an event when that's useful for your tracking setup. For example:
- 50 to represent an estimated lead value of $50;
- 1 to represent a simple yes/no-style completion value;
- 3 to represent the number of items involved in an action;
- 100 to represent a score or internal weighting you use for that event.
You don't need to add a value just because the field exists. Only use it when the number has a clear meaning for your analysis.
Fields Object
The Fields Object is optional and not used in this example, but it lets you attach extra details to an event when the Category, Action, and Label aren't enough on their own. For example, if you're tracking a Book a Demo form submission, you might use it to record additional context such as:
- which version of the form was submitted;
- where the form appeared on the website;
- and, which product or service the form related to.
This can make it easier to distinguish and analyze similar events later. But if you don't need any extra information, you can simply leave this field blank.
Binding Browser Action
The Binding Browser Action tells TWIPLA which browser action should trigger your Custom Event. Common examples include:
- Click a button or link with onclick;
- Submit a form with onsubmit;
- Change the value of a form field with onchange;
- Focus on an element, such as a form field, with onfocus.
For our Book a Demo example, we’ve selected: onsubmit but you should choose the browser action that most closely matches the interaction you want to measure.
This is different from the Event Action. The Event Action is the name you give the interaction in TWIPLA (such as Form Submission) while the Binding Browser Action is the actual browser action that causes the event tag to fire.
Internal Event Note
An Internal Event Note is optional and can document why you created the tag or how you use it. This doesn't change the event itself, but clear notes can make a larger custom event tracking setup much easier to manage.
Once you configure the fields, generate the Custom Event Tag.
3. Add the Custom Event Tag to your website
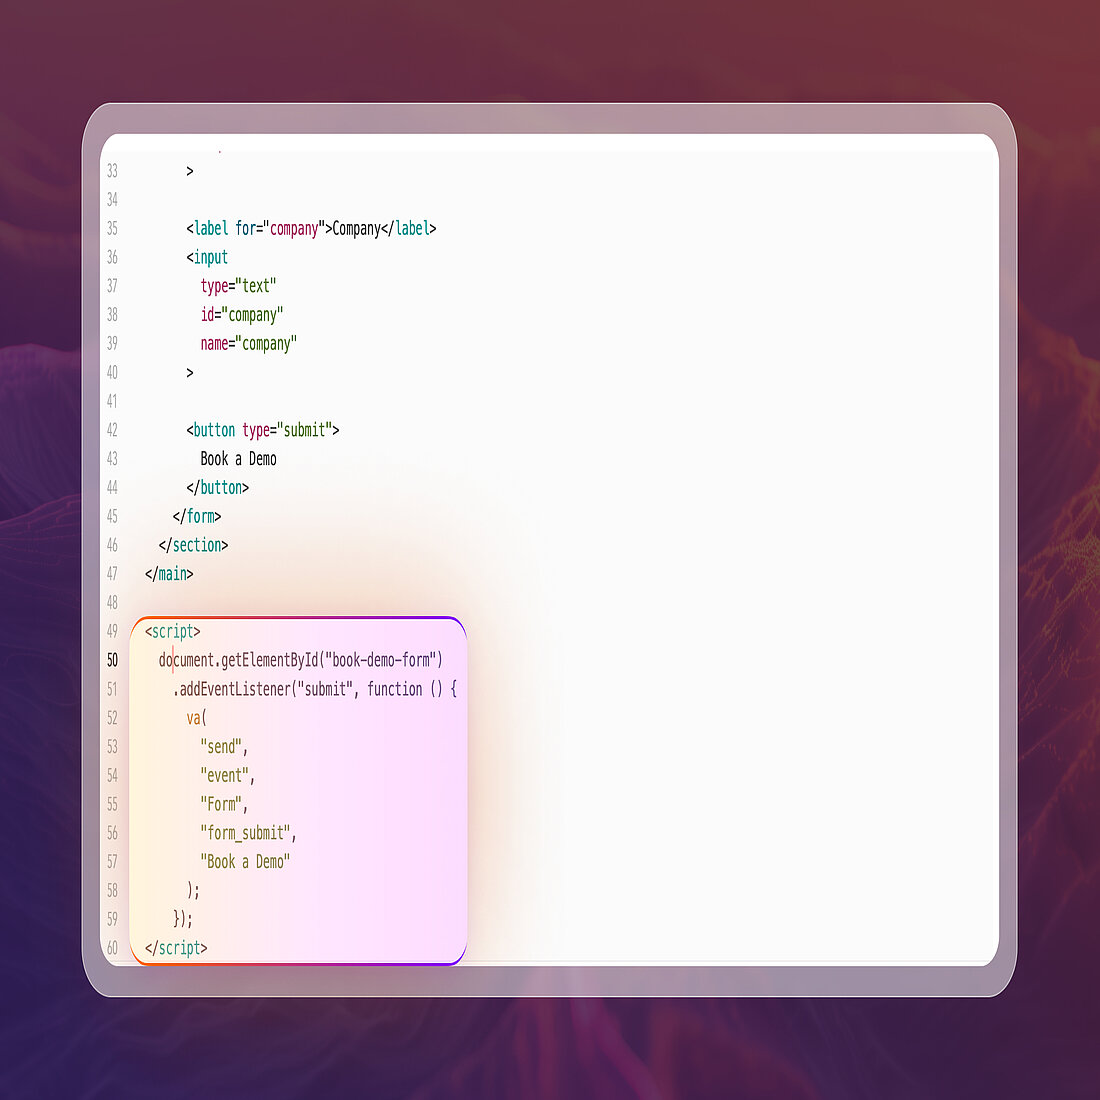
Creating the tag in TWIPLA doesn't automatically connect it to the relevant website element. The generated code also needs to be installed on your site.
The recommended approach is to attach it using a JavaScript event listener, with a simplified example looking like this:
JavaScript event listener
document.getElementById("book-demo-form")
  .addEventListener("submit", function () {
    va(
      "send",
      "event",
      "Lead Generation",
      "Form Submission",
      "Book a Demo"
    );
  });
Note: For your own website, use the event tag that TWIPLA generates rather than manually recreating it from this example.
Using addEventListener is preferable because it keeps your tracking behavior separate from your HTML, supports multiple event handlers, and is less likely to interfere with other JavaScript running on the site.
Using inline HTML instead
Custom Event Tags can also be triggered directly from an HTML event handler. For example:
<form
  id="book-demo-form"
  onsubmit="va('send', 'event', 'Lead Generation', 'Form Submission', 'Book a Demo');"
>
This can work fine for simple implementations, but inline handlers are generally more fragile. Other JavaScript can overwrite them, and they become harder to manage as a website grows.
For that reason, JavaScript event listeners should normally be your first choice.
Make sure you're tracking the action you actually care about
There's another important consideration when tracking form submissions.
A browser onsubmit event tells you that the form submission process was initiated. Depending on how your website handles forms, that may not always be the same as confirming that the submission was successfully processed.
If your form uses JavaScript, an API, or another process that confirms success after the initial submit action, consider firing your TWIPLA Custom Event at that confirmed-success stage instead.
The principle is simple: track the outcome you actually want the event to represent.
4. Test your Custom Event
After you install the tag, test it before relying on the resulting data.
Visit the relevant page on your website and perform the interaction you've configured. For our example, submit the Book a Demo form.
Then go to:
Event Tracking → Custom Events
Custom Events will normally appear almost immediately after the relevant browser action triggers them.
If your event appears with the Category, Action, Label, and other information you configured, the setup is working.
If it doesn't appear right away, a short delay can occasionally occur because of network conditions or processing.
But if the event still doesn't show up, check the following:
- Make sure TWIPLA isn't ignoring your own visits based on your IP address or browser;
- Confirm that every relevant page loads the TWIPLA tracking code correctly;
- Turn on Track Manually Created Event Tags;
- Place the Custom Event Tag on the correct element or action;
- Verify that the correct browser action triggers the tag;
- Compare the event definition with the implementation on the website.
You can also perform the interaction in another browser or environment to help rule out a local browser or caching issue.
Need more help? Premium plan users can ask TWAIA, our AI assistant, for guidance. All users can also contact our support team directly.
5. Analyze what happens around the event
Confirming that the event fires is only the first step.
The real value comes from using Custom Events to better understand the website activity surrounding an important interaction.
TWIPLA's Custom Events reporting lets you examine individual triggers and associated information, including details such as the event Category, Action, Label, trigger URL, timestamp, and device.
You can also filter and group your event data to investigate particular subsets of activity.
With our Book a Demo example, the useful question isn't simply:
How many demo form submissions did we record? Because you might also want to understand:
- which pages generated those interactions;
- how those interactions relate to particular campaigns;
- whether particular devices behave differently;
- how submissions change over time;
- what visitors did before reaching the form;
- how the interaction fits into a wider conversion journey.
That turns an isolated website interaction into something you can investigate alongside your broader visitor and performance data.
Manage your generated Custom Event Tags
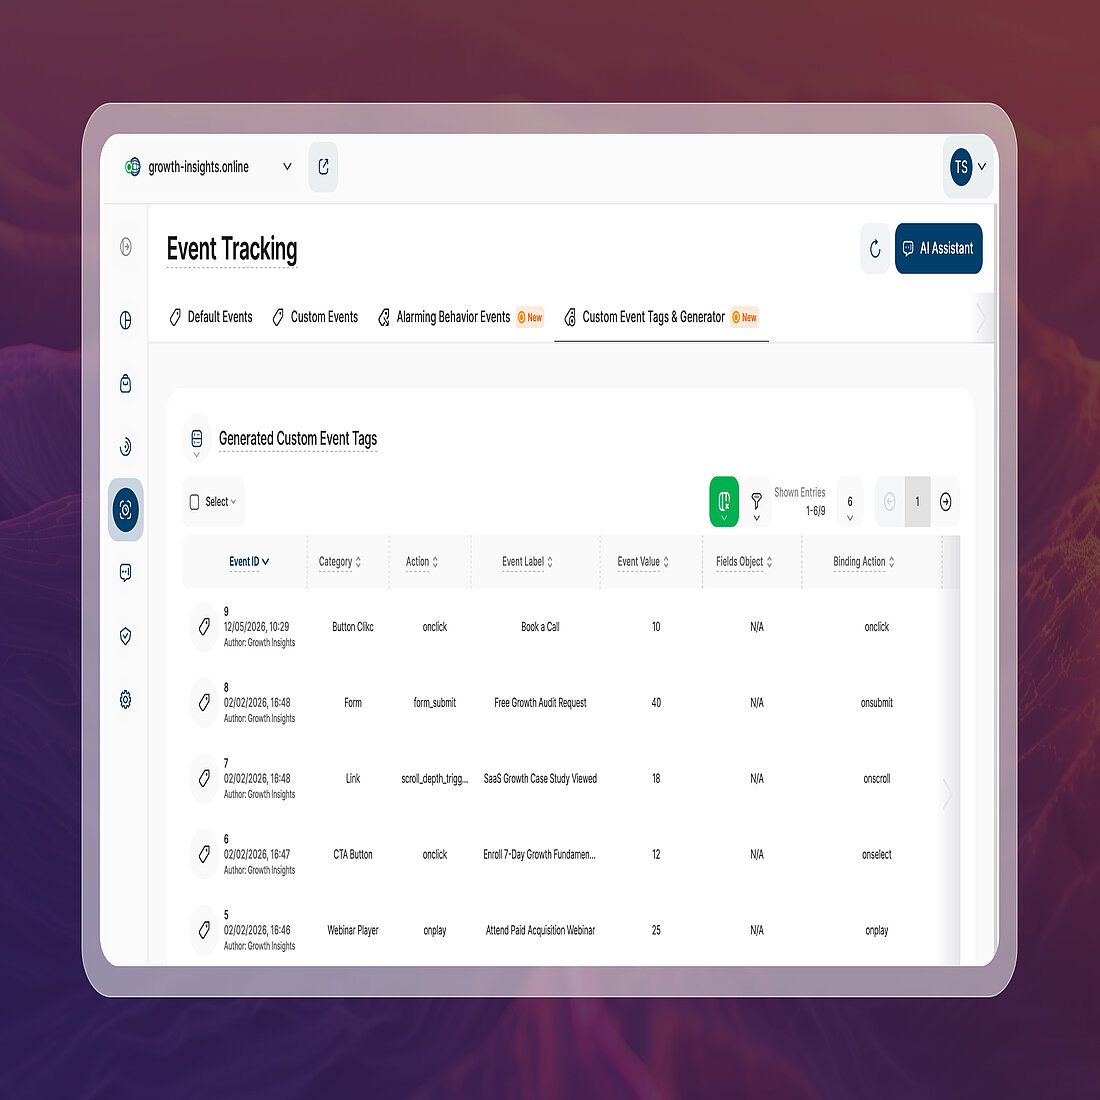
Generated Custom Event Tags remain available inside TWIPLA so that you can review and manage your implementation.
For an existing tag, you can:
- view all its exact-match triggers;
- edit its Internal Event Note;
- copy the generated tag;
- delete the tag when you no longer need it.
You can't edit the main event definition after you generate the tag.
If you need to change properties such as the Category, Action, Label, Value, Fields Object, or Binding Browser Action, create a new Custom Event Tag with the new configuration.
This makes a clear naming system particularly valuable. Consistent Categories, Actions, and Labels make your event data much easier to interpret as your tracking setup expands.
Where else can you track custom events on your website?
Once you understand how to track custom events, the same process can be applied to many different interactions.
But start with your business questions rather than with the technology.
Instead of asking: What else can I track?
Ask: What interaction do I need to understand that my existing analytics doesn't identify clearly enough?
If TWIPLA's Default Events already provide the answer, you may not need to create anything manually.
If you need to distinguish a particular action — such as a specific lead form, download, registration, or website feature interaction — a Custom Event can give that behavior the additional context you need.
How to track custom events that actually matter
Event tracking shouldn't be about collecting more data for the sake of it.
Default Events can automatically give you visibility into common website interactions. Custom Events let you go further by defining the specific actions that matter to your organization.
A completed demo request can become more than another interaction buried among your website activity. It becomes an identifiable event that you can examine alongside the visitor, page, campaign, and journey data surrounding it.
That's what makes custom event tracking valuable: turning important website interactions into data you can actually investigate and understand.
Share article


Get Started for Free
Gain World-Class Insights & Offer Innovative Privacy & Security


 08 September 2023